
It is known that VCRs of old models have become obsolete and it is no longer possible to find them in electrical goods stores, but there are people who still have this technique. They use equipment for viewing cassettes on which there are various holiday videos, series, old films, etc. To play, you need to know how to connect a tape recorder to a TV.
Preparation and necessary wires
A description of connecting a tape recorder to a TV is available in the documentation for using the equipment. The connection of the plugs takes place in stages, but you may encounter the problem of the lack of connectors needed for connection.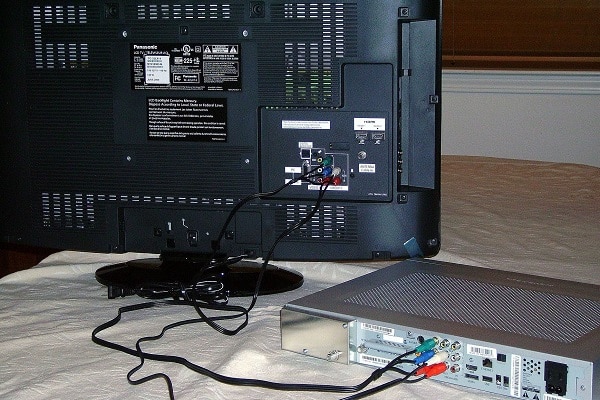 These devices use the following connections:
- RCA (tulip);
- coaxial cord;
- SCART cable;
- S video.
There should be no problems when connecting a cassette gadget to an old TV, but in modern TVs you will not always find such ports, so adapters (adapters) are needed to connect, which will simplify the connection process.
Connection methods
There are many connection options, but some types of modern TVs are not equipped with the necessary ports. For example, Samsung has completely abandoned RCA outputs, while other TV models, such as Philips, Sony, etc., continue to use a large number of outputs, including “tulip”.
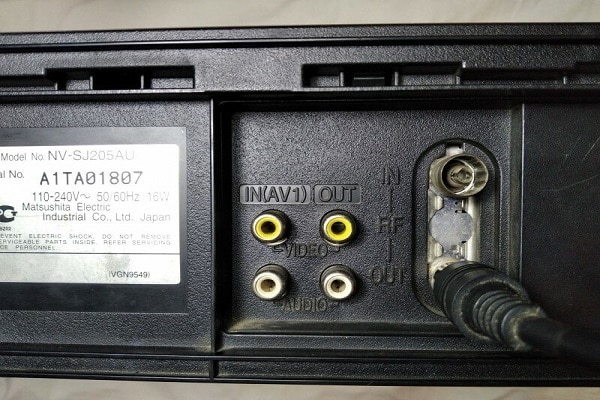
RCA (tulip)
In frequent cases, old cassette players and TVs are equipped with only these connectors, on modern TVs this port may not be available, so you will have to use adapters. Connecting a tape recorder via RCA is as follows:
- Plug the yellow plug into the Video OUT port on the VCR, and plug the other end into the same color port on the TV called Video 1 or 2.
- Connect the red and white limit switches in the audio transmission toggle switch, then turn on the devices and press the Play button on the player.
- On the TV remote control, turn on AV, if the Menu is displayed, then the connection is correct.
- Reboot the equipment to save the settings, insert a cassette and enjoy the video.

Tulip is the most common connection method, but the signal transmission is considered weak, so the video and sound quality decreases when viewing, the only thing that can be done to improve the sound signal is to connect a stereo headset (speakers or headphones).
SCART
This port allows you to output images and sound effects in quite decent quality, but like the “tulip”, it is outdated, and you can rarely find this port on a modern TV, so SCART-RCA or SCART-USB adapters are often used. The equipment is connected as follows:
- Connect the SCART cable to the jacks of the tape recorder and TV. If using the adapter on the TV panel, connect the plug to RCA or USB.
- Insert a video cassette, and in the TV settings, select the signal source – RCA, SCART or USB.
- The contents of the video cassette should open on the TV screen. If this happens, then the connection was successful.
In case of failure, disconnect the equipment from the network, then try to connect again, insert a video cassette and set up additional functions to improve the quality of the image and sound.
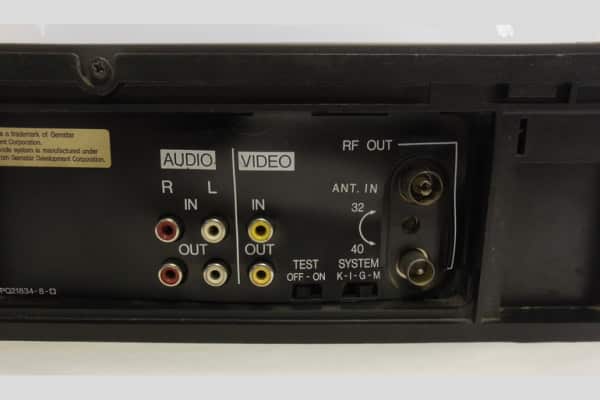
Coaxial cable
This is a telecommunications wire that allows you to transmit broadcast with several high-quality signals. Suitable for most TVs such as Samsung, LG and Sony. To connect, follow the instructions:
- Plug the plug into the player’s RF/Coax Out port and the other into the TV’s RF/Coax In jack.

- Turn on the equipment and press the Play button, start the channel search through the TV remote control menu.
- After detecting the reception frequency of the tape recorder, save it under any convenient number, this will help to avoid the need to reconnect the player.
- Insert a cassette and adjust the audio quality and picture contrast.

The disadvantage of this connection is the periodic failure of the channel, because the old equipment has “broken” ports, so the signal is often incorrectly received. If this happens quite often, you should replace the connectors with new ones.
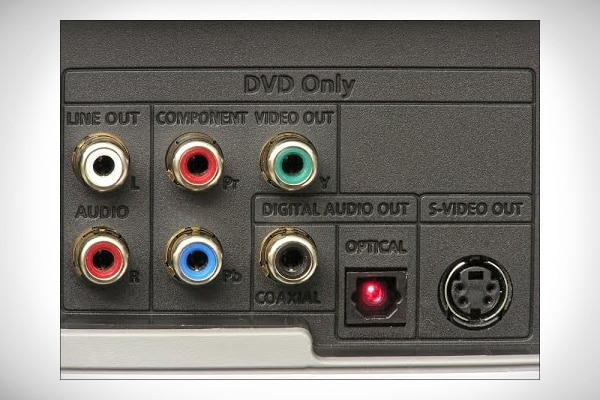
S-Video
For this connection, an additional adapter is required, because the player’s limit switch is connected to the output of the antenna port, the plugs themselves have a color scheme, which will facilitate the operation of the installation. The connection is made according to the following rules:
- Insert the colored plugs into the player, observing the correct connectors. Connect the other ends to the S-Video adapter.

- Connect the main plug of the adapter to the antenna output, then go to the main menu and press AV, for new TVs, the name of the player will be “S-Video Out”.
- The name of the VCR will be displayed on the screen. After that, insert the cassette and check if everything works properly.

After installation, disconnect the equipment from the network for a few minutes, after turning it on, configure the necessary data (sound signal and image). This cable is considered the best because the video transmission and sound effect is more powerful.
How not to knock down the antenna when connecting a VCR?
To connect a VCR to a TV without pulling out the cord, you need to purchase a set-top box that will act as an adapter, as well as buy two RCA cables and one coaxial cable. The connection is made as follows:
- Plug the coaxial cable into the Cable Out jack on the tuner and RF In on the tape recorder.
- Connect the “tulip” plugs to the Audio Out and Video Out outputs on the set-top box, and to the Audio In and Video In outputs on the tape recorder.
- Connect the remaining wires to the TV and video player, open the TV menu and find the “data broadcast source”.
- Find the name of the VCR in the menu and insert a cassette. If the connection is correct, the contents of the media will be displayed on the screen.
- Reboot the hardware.


It is important to remember that before performing any action, the equipment should be turned off from the electrical network, this will prevent the possibility of a short circuit or damage to the equipment.
How to check the connection?
After connecting the equipment, check work should be performed, this will make sure that the actions are performed correctly. What to look for:
- If the connection is made by coaxial wire. You need to turn on the tape recorder and TV. When the TV screen goes into standby mode, you need to insert a cassette and start playing the video. If everything is in order, after turning off the equipment, the TV automatically switches to normal channel broadcasting. To further turn on the tape recorder, you need to press Play and select the number on which the settings of the video recorder were saved.
- To test an RCA cable. It is necessary to press the Source button on the player’s control panel. The TV should then go into standby mode. If the connection does not occur, you should check the correct installation of the plugs in the ports. The colors of the terminals must match the colors of the plugs. After you need to enter the AV menu, the video cassette recording will be displayed on the screen, after which you should select the desired video and press the Play button.
- scart cord. Allows you to connect devices at the same time, for this you should use the Source button. The main panel will appear on the screen, where the subsequent settings for playing the video cassette will be indicated.
Make sure that the wires are firmly inserted, the incoming signal, picture quality and sound effects depend on this.
Possible difficulties
Connecting a VCR to LG, Philips, Samsung TVs (directly or using an adapter) is quite simple, the main thing is not to confuse the input and output ports, but some technical problems may arise.
No connectors
The most common problem is different connectors on the tape recorder and TV. In this case, special adapters will help, which will simplify the connection process. What adapters are suitable:
- SCART-SCART. This cord is required if the TV and VCR sockets are identical.
- SCART-RCA. In the event that the player has only a “tulip” output. This wire is the best option, because the limit switch displays video and sound at the same time.
- S-Video-SCART-2RCA. If the TV has several ports, and the tape recorder is only RCA. The S-Video wire cannot transmit audio, so an additional 2RCA cable must be installed.
The first name is the TV plug, the second name is the port that is used in the VCR, so before purchasing an adapter, carefully look at the port names on both devices.
No signal
Often, after connecting an old video player, there is such a problem as a lack of signal. This may depend on various factors. The reasons may be the following:
- The TV panel is not set to receive a signal from the tape recorder. In this case, you need to go to the TV menu and find “available devices” on the panel. Press AV, after which the TV goes into standby mode, insert a video cassette and press Play.
- Broken plugs. During the long operation of the tape recorder, the ports fail, therefore, when the plug is installed, the signal does not arrive. In this case, the hardware should be repaired.
- wire integrity. Most often, the “break” of the cord occurs at the bend, so you need to make sure that the cable does not bend when connecting. These malfunctions can lead to voltage drops and damage to the equipment.
Do not try to make repairs yourself, it is better to contact the service, where they will carry out high-quality repairs or replacement of components, while the master will diagnose the device.
Sound overlay from TV channels
If there are no problems with video transmission, and the sound is played not only from the VCR, but also in parallel from the TV channels, the problem is in the antenna connection, namely in its position. The player broadcasts at low frequencies, and the working antenna at high frequencies, so it knocks down the signal. Change the position of the antenna by rotating or moving, and as soon as the signal of the broadcast channels is lost, reboot the equipment. Then turn on only the TV and adjust the sound according to the frequency of the channels broadcast. This is necessary so that the signal reception takes place separately from the TV.
Recommendations
Before starting the connection, it is better to study the instructions that are attached to each device (if any), this will help you understand the principle of subsequent actions. It is also better to adhere to the following rules and tips:
- check the serviceability of each equipment, otherwise the connection will be meaningless, or even dangerous;
- prepare the necessary wires and adapters – if during the work it turns out that the cord does not fit or is faulty, the replacement will take a long time;
- observe safety precautions – you can not connect the cable to the switched on equipment, this can lead to a breakdown or a short circuit;
- on the VCR, clean the magnetic head – if you do not know how to do this, contact the service center, where specialists will diagnose and clean;
- after each connection, restart the equipment, this will help save the connection settings;
- if during video playback you hear “crackling” inside the equipment, you should contact the master, the head may have dried up;
- try not to bend the wires, as this can lead to a quick “break” of the microwires.
Now you know how to connect your VCR to your TV and watch your favorite cassette videos. The connection procedure is quite simple, the main thing is to treat it with due attention. In case of problems, it is advisable to contact specialized stores where you will be helped.


