Connecting a rear view camera to a car radio – instructions for connecting Chinese, Android, 2din, to the recorder, mirror: connection diagram, video instructions, possible problems.Nowadays, it is difficult to imagine a car without a DVR and a rear view camera. They are used not only for recording accidents, but also as good assistants when parking. Often, in a set with a rear view camera, manufacturers also include a screen on which the view will be transmitted. As a rule, it is installed on the dashboard in the form of a monitor. However, despite the ease of installation of such a device, it has a noticeable disadvantage – it takes up space and can be inconvenient for the driver. Therefore, many motorists prefer to connect a rear view camera to the car radio. This type of connection is considered the most convenient due to its versatility: any radio, both standard and third-party, can be used to transmit a video signal. It is especially popular to connect a rear view camera to the car radio now, when almost every car has android devices.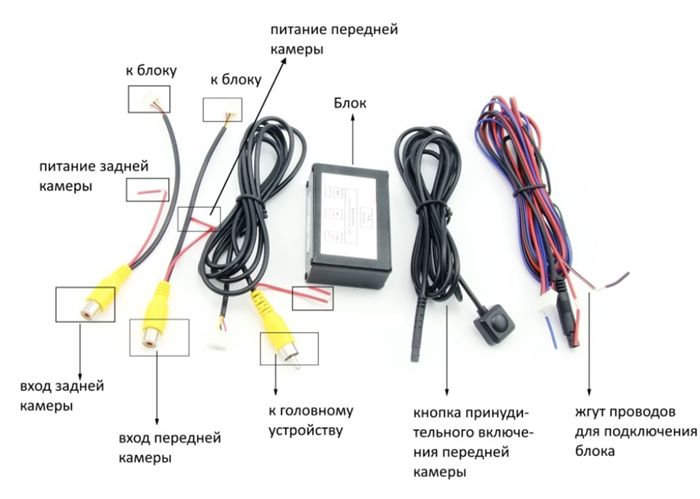
- General instructions for connecting a standard radio
- How to connect a rear view camera from the dash cam to the radio
- Connecting a Chinese radio
- Connecting an Android radio
- Connecting a 2din radio
- Connecting a wireless rear view camera to the radio
- Why doesn’t the rear view camera turn on when I shift into reverse?
- Why doesn’t the radio see the camera?
- Why doesn’t the rear view camera show an image?
- Other problems
General instructions for connecting a standard radio
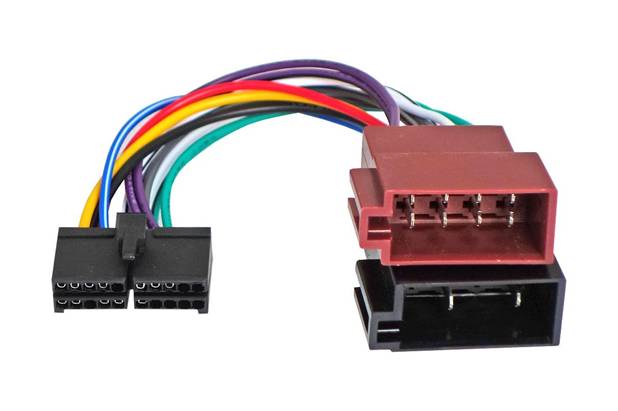
The radio is connected using an ISO connector. On different devices it can be either solid or bifurcated. The groups of wires in it are divided according to the principle:
- Power inputs and outputs – connect to the machine system and are responsible for powering the radio and its operation together with the machine programs. This will be discussed in more detail below.
- Acoustic outputs – they are responsible for the interaction of the car’s acoustic system and send signals to the front and rear speakers in the car.
 Regardless of the type of connector, the connection will be the same.
Important note: you must connect the radio to the car only with the battery disconnected. Otherwise, there is a risk of experiencing a short circuit.
Now let’s look at which wires are responsible for what and how they are connected:
- Black – constant minus – connects to ground.
- Yellow – permanent plus – it is advisable to connect with a fuse to the power wires or directly to the battery using terminals.
- Red – plus – is responsible for controlling the power of the radio. Usually connected to the first position of the ignition switch along with other systems. For autonomous operation of the radio, you can connect this wire to the yellow one and connect it to a constant plus.
- Orange – plus – is responsible for adjusting the brightness of the backlight and connects to the car’s backlight wires.
- Blue – plus – output wire that controls external devices such as an antenna or amplifier.
The next group of wires is acoustic. They come in pairs: the colored wire corresponds to the positive, and the striped wire corresponds to the negative.
- White – left front speaker.
- Gray – right front speaker.
- Green – left rear speaker.
- Purple – right rear speaker.
Standard connection of the camera to a Chinese car radio: https://youtu.be/V4i-YVRk9_c This is a standard set of wires that is found in all types of radios. But multimedia devices have two additional wires: Brake and Revers. The first one is responsible for safety and does not allow you to watch videos while driving so that the driver does not get distracted. The second one connects to the rear view camera and automatically displays the view from it when the driver engages reverse gear. Also on the rear panel there are RCE and RCA connectors, also known as tulips. The former are used as outputs of amplifiers and preamplifiers. The latter interact with multimedia devices. There are RCA output connectors that transmit a signal to external screens and input connectors that receive this signal from external devices. The latter is sometimes connected to a tulip from the rear view camera. However, most radio tape recorders have a special connector designed to connect a camera. It is designated as CAM or RCM. As a rule, it is distinguished by the yellow color of a tulip (for example, in the diagram below it is marked at number 2 as CAMERA IN).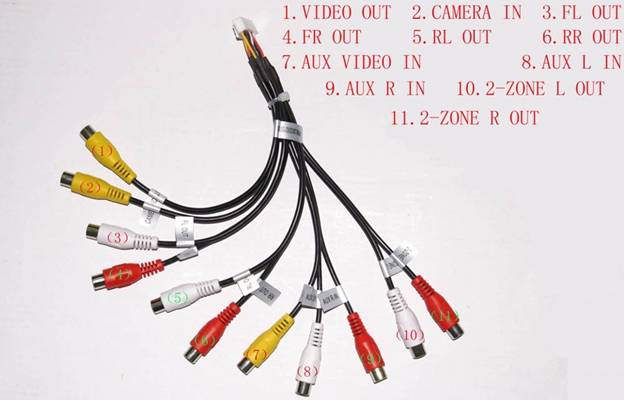 Now let’s look at the nuances of connection.
How to connect a rear view camera from the dash cam to the radio
Now that we have figured out how to connect the radio to the car system, let’s move on to connecting the camera. To begin with, it is worth considering where and how the camera itself will be mounted. If possible, it is worth preparing fasteners and screws. They may be needed to route wires inside the car. After installing the camera, you need to find two wires of the following type:
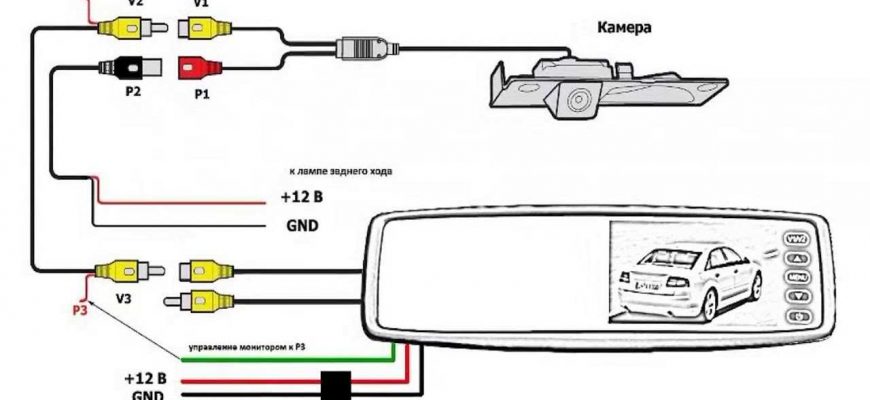
- Red. Two laces come from it, red (plus) and black (minus). They are connected to contacts that supply power to the reversing light.
Attention! Before the procedure, you must disconnect the brake light block.
- Yellow. Responsible for the video output and connects to the radio. It has a pink cord that needs to be connected to the Revers. A brief diagram is shown in the picture below.
 The length of the cable running to the monitor can be from 3 to 5 meters. This is enough to stretch it through the roof of the car or along the thresholds. After this, you can turn on the camera and check how it interacts with the radio.
Connecting a Chinese radio
Modern Chinese radio models have a standard ISO connector. Thanks to this, they can be easily connected to any machine.
Just keep in mind that not all Chinese radios may be compatible. You may need to purchase an appropriate adapter to connect correctly to the machine.
Connecting an Android radio
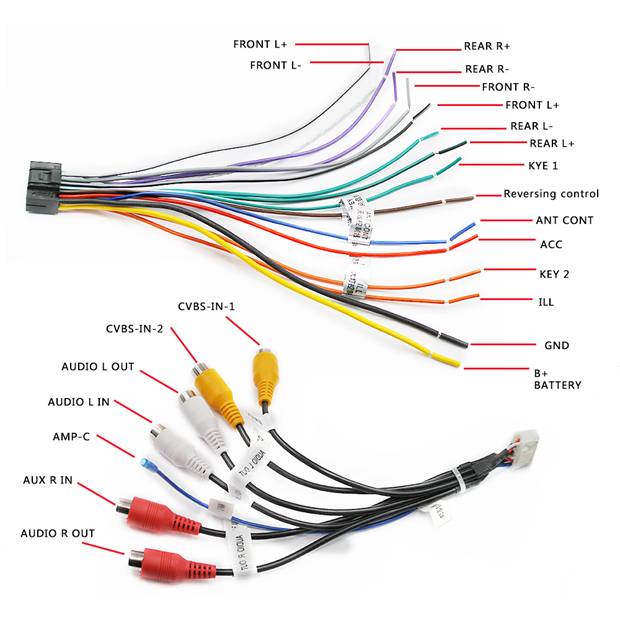
Details of what is connected to what on the Android radio can be seen in the attached diagram below.
Note: The topmost blue connector is usually left unconnected to anything.
After connecting the rear view camera, you need to go to the application store and install the appropriate software from the developer for the camera. The official application not only provides for expanding the functions of the gadget, but also, with timely updates, can solve many problems associated with the failure of the device program.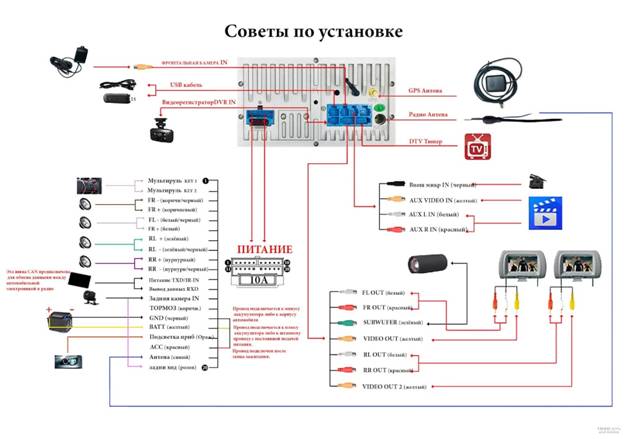
Connecting a 2din radio
The standard connection of a 2din radio is via two ISO connector boxes. If it is missing, then you have to do the pinout manually. How to do this is described above. Connecting a rear view camera to a 2din radio for a Chevrolet Lanos: https://youtu.be/uHNBzMVpoGk The picture below shows a detailed diagram of which wire is responsible for what.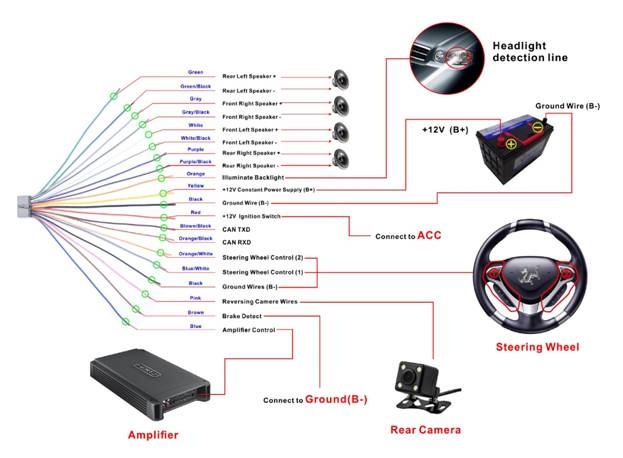
Connecting a wireless rear view camera to the radio
The process of connecting a wi-fi rear view camera to the radio is slightly different from a wired one. It is considered even lighter and more convenient, because a wireless camera does not have such a long wire laid through the entire car, which means the risk of malfunction due to cable damage is lower. And the picture quality does not suffer. The wireless rear view camera comes with two Wi-Fi receivers. The first one has two tulips and connects to the corresponding tulips on the camera. The outgoing free wire must be connected to the positive side of the reversing lights.
Note: place the wi-fi receiver away from metal elements and parts. The signal can shield and cause interruptions in the operation of the device.
The second receiver is connected to the radio. The tulip connects with Revers or the corresponding tulip for the rear view camera. The outgoing wire can be powered from the battery or the ignition switch. In the latter case, the device will start along with the machine. 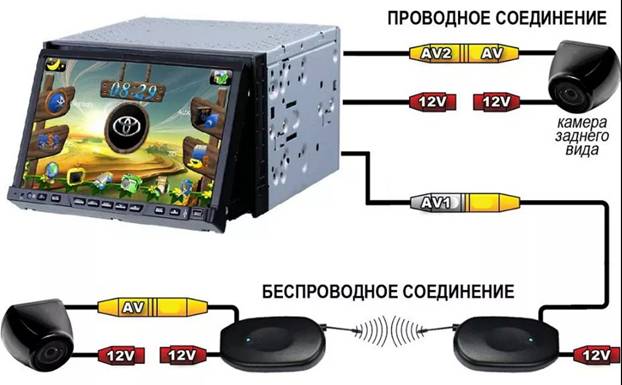 After installing and connecting the camera, you need to install the appropriate programs for correct operation. Sometimes the supplier sends the necessary software complete with the camera. However, if this does not happen, you should go to the manufacturer’s website and download the files yourself.
Note: Be careful not to download programs from third-party sites. They may contain viruses or provide outdated versions.
After installing the software, you should configure the camera so that it turns on when the car reverses. Depending on the manufacturer, the installed software may also provide additional configuration functions.
Why doesn’t the rear view camera turn on when I shift into reverse?
Most likely, the reason is due to interruptions in the operation of the signal lights. Since the power supply of the camera itself is directly connected to the power supply circuit for the reverse signals, interruptions in their operation may affect the camera’s ability to display an image. It is worth checking whether the rear entrance lights turn on. Sometimes the problem can be solved by replacing burnt out lamps. Less commonly, the malfunction lies in a malfunction of the reverse gear sensor.
Why doesn’t the radio see the camera?
- Interruptions due to other connected devices.
Sometimes a connected tablet or TV may conflict with the connected camera. To make sure what the problem is, you need to disconnect these devices from the radio for the duration of the diagnosis. Sometimes you can fix the problem by reconnecting the devices. However, you may have to choose which is more necessary: a connected tablet or a rear view camera.
- Incorrect menu settings.
Devices from different manufacturers transmit video in different formats. Sometimes you just need to specify the desired format in the settings. To do this, you need to click on the gear icon and go to the developer settings. Next, select: Protocol Parameter Settings > Reverse video resolution settings. Select a new format from those offered and reboot the device. This procedure may have to be repeated several times, trying out all the proposed formats until you find the right one.
Why doesn’t the rear view camera show an image?
Let’s look at the most common reasons why, after connecting, the radio does not see the rear view camera.
- The integrity of the cable connection is broken.
In this case, the tulip heads do not fit tightly together, which is why the signal is not transmitted further. You can check this by seeing whether the parts of the connector fit tightly together at the point of connection to the rear view camera and connection to the radio. In most cases, the problem can be solved by snapping the tulips all the way or moving the wire in different directions. In advanced cases, it may be necessary to replace the contacts or the connecting wire itself.
- The lens is dirty.
In this case, the signal is transmitted from the DVR, but the driver on the screen, instead of the landscape behind the car, can see a blurred and unclear picture or a dark spot. To restore visibility, simply wipe the lens with a damp cloth or rag. To prevent this problem, it is recommended to wipe the camera’s viewport between trips.
- Mechanical damage to the camera.
If there is no response from the camera, it is most likely damaged. Cameras located outside the car most often suffer from this. It is necessary to remove and inspect the device for chips, cracks and other damage. In this case, you will most likely need to replace the damaged device with a new one.
- Moisture gets inside the device.
Accumulated moisture and condensation inside the camera are often found even on expensive models. The problem lies in the old sealant, which can wear out over time. In rare cases, you are “lucky” to receive a new model, raw inside. This can happen with models assembled in South Korea. It can be changed by first disassembling and drying the device. After reassembly, it is recommended to carefully treat the joints with the same sealant. Installing an Android radio with a reverse camera with your own hands – setup and connection: https://youtu.be/8kNmVxVI2hE
Other problems
- The rear view camera starts by itself. In particular, this occurs on cars equipped with an automatic transmission. Position R is responsible for engaging reverse. The automatic transmission lever passes through it when the driver selects mode D. Because of this, false camera alarms are possible.
Solution: Additionally install a delay sensor. Thanks to this, the control signal will not be sent to the monitor immediately, but after some time.
- The image is cloudy even after wiping the outside of the lens. A blurry image may indicate that dirt has gotten onto the inside of the lens rather than the outside. A similar effect can also be caused by a large amount of moisture inside the chamber.
Solution: Carefully disassemble the gadget, clean it with a soft cloth, brush or cotton pad and let it dry. Next, you need to assemble the camera back and treat the joints with sealant. For further protection against contamination, you can purchase a special protective case, which will significantly extend the life of the device.
- There is a long delay in the image on the screen, blinking or strong flickering of the signal. This can happen due to errors when installing the camera or laying the wire inside the cabin. If the camera is not securely fastened, it may move around while the vehicle is running and cause problems.
Solution: Check the camera mount. If it is loose, eliminate the looseness by securing it with self-tapping screws. You may have to find a new place for the rear view camera where it won’t wobble around so much.
Note: There is a possibility that poor contact insulation or cable damage is to blame for the delay and signal loss. In this case, you will have to go through and check all electronic components for serviceability and replace damaged parts.
- Blank screen when reverse gear is engaged. If instead of a picture on the display a black, white or blue screen sometimes appears with an error message, then most likely the problem lies in a software hardware failure.
Solution: Take the device to a service center, where a specialist can reflash it. It is highly not recommended to reinstall the software yourself. This procedure requires not only specialized programs, which are not always publicly available, but also special skills. Without knowledge and experience, you can not only fail to achieve the appearance of a picture, but also make the device unsuitable for further use.
- The camera is not working correctly. This item includes any strange behavior of the camera: turning off in cold or hot weather, unpredictable on and off, flickering or blinking of the image. The reason for this behavior may be poor signal quality.
Solution: It is necessary to disassemble the rear view camera and carefully remove dirt from the contacts and clean the chips from dust. Visibly damaged board components can be re-soldered. If oxidized elements are found during the cleaning process, they must also be cleaned with alcohol-containing cleaners. You can do this at home using a cotton swab soaked in vinegar or ammonia. After this, it is recommended to treat them with a water-repellent composition.
- The image from the rear view camera is displayed incorrectly. It’s not uncommon for a rearview camera to show a mirror image or upside down view. The most common reason for this behavior is that the camera is not installed correctly, causing the device to simply be upside down.
Connecting a rear view camera to a mirror with a monitor, diagram of connecting wires to the amplifier, ignition switch, cartridge diagram: https://youtu.be/YeI6zz37SSM Solution number 1 : In the camera settings, you need to find and disable the Mirror function. Sometimes the camera is universal and there is no such function in its settings menu. In this case, you will need to open the device body and rotate the eyepiece 180 degrees. Solution number 2 : You should contact him if the first option did not work. In this case, for the camera to operate correctly, you will have to manually change its control scheme. To do this you will have to open the device. Complete the following steps in this order:
- Find the recesses on the camera body and unscrew the camera cover in the direction of the thread.
- Take out the board. Proceed with care to avoid damaging and subsequently disrupting the camera’s focus.
- Find the resistor jumpers marked MIR and FLP. The first one is responsible for the vertical rotation of the image, and the second one, respectively, for the horizontal one.
- Unsolder the corresponding jumper to expand the image.
- Apply a layer of varnish to the board and wait until it dries. After this, you can put the device back together and test the image.