
The popular Digital Living Network Alliance technology will allow you to comfortably transfer any media content to devices of various groups and brands. About how DLNA works, what devices are supported and how it is configured, read further in the review.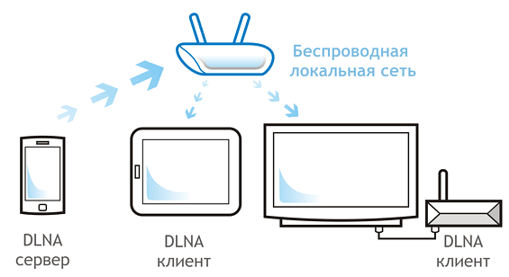
- What is DLNA
- Devices and DLNA support
- How DLNA technology works
- DLNA function on TV
- Setting up the DLNA function on LG TVs
- Setting up DLNA on SAMSUNG TV
- Setting up DLNA data transfer on Philips
- Setting up DLNA on Sony branded TVs
- How to set up DLNA on Xiaomi TVs
- DLNA connection on Windows 10
- Working with OS Linux
- Setting in MAC OS
- Connection errors and their solution
What is DLNA
DLNA is a joint development between Intel, Microsoft and Sony. It is a set of standards that will allow compatible devices to transmit and receive any media files (photo, audio, video) over a wired or wireless Internet network, as well as play them online. In other words, it is a technology for connecting TVs, computers, digital cameras, printers, smartphones and other consumer electronics into a single network. With the help of DLNA, we send photos and videos taken on a mobile phone to the TV screen without unnecessary wires. Photos from a digital camera are sent directly to the printer. Thanks to the same option, we listen to our favorite music from the tablet through the computer speakers, etc.
Note! With Digital Living Network Alliance technology, all media content is streamed, and you don’t have to wait for files to fully download to play them.
Devices and DLNA support
All devices that comply with DLNA standards are conventionally divided into 3 groups:
- The first group includes all household network devices . These include TVs, video players, audio systems, music centers, printers, network storages, etc. According to their functionality, devices are divided into media players (DMP), media servers (DMS), media players (DMP), media controllers (DMC) and media renderers (DMR).
- The second group is mobile devices : phones, portable players, cameras and camcorders, pocket computers, etc. Mobile devices are divided into the following classes according to functionality: mobile media players, media servers, loaders, transmitters and controllers.
- The third group combines all household multifunctional devices . This includes devices that support additional communication standards and convert data formats.
All DLNA-certified devices are marked with the appropriate “DLNA Certified” logo. Today it is about 4.5 billion devices from more than 250 manufacturers. Modern personal computers and laptops, regardless of their operating system, are also DLNA-compatible. But, when working with them to exchange data over the protocol, you first need to install specialized software that is downloaded from the network.
Important! For a successful exchange of media files, both devices must support the DLNA protocol.
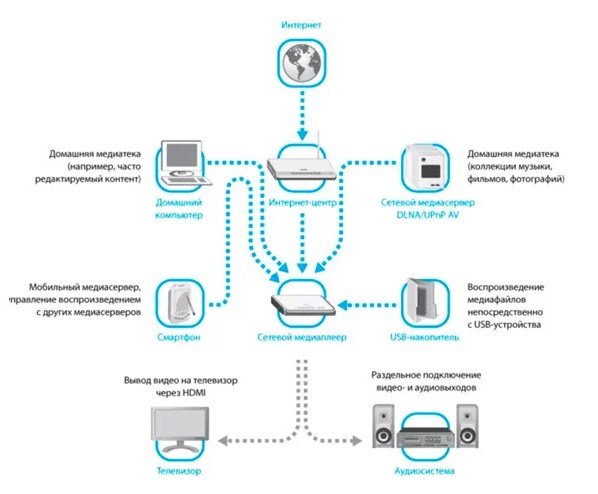
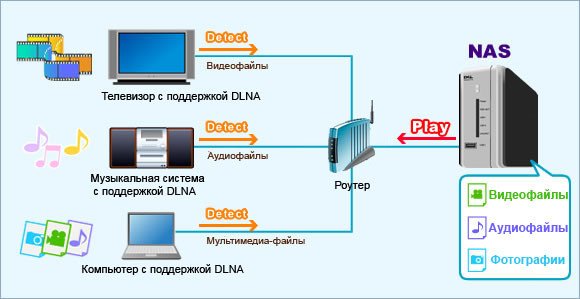
How DLNA technology works
Two compatible devices participate in the exchange of content via the DLNA protocol: a server and a client or DLNA player. A server is a device that stores and transmits any media content to the second. To automatically transfer data to DLNA devices on the server, share media files for homegroup devices. The client or player is the device that receives and plays the received files. Most often, TVs, audio and video players act as a client. Some devices are combined into a single network automatically. To work with others, you will need a simple initial setup, which we will discuss next. A prerequisite for the DLNA protocol is the connection of all devices to the Internet. File exchange will be carried out on it.
Important! To transfer data, all devices must be connected to a single home network. Otherwise, you will not be able to use the DLNA option.
DLNA function on TV
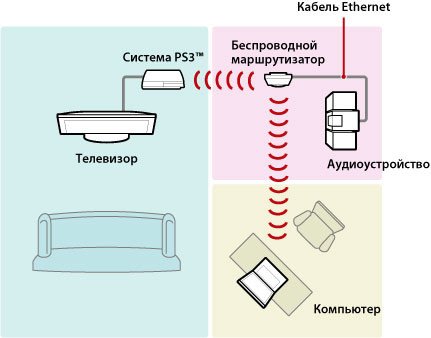
The DLNA function is built into most modern TVs. To find out if it is supported on your device, refer to the user manual, or find the information you need on the official DLNA website. To transfer data via DLNA, the TV must be connected to the router:
- over a Wi-Fi network;
- or with an internet cable.
Note! When transferring heavy files to the TV, it is recommended to establish a wired (Ethernet) connection. This will avoid loss of streaming data and system failures.
For a wired TV connection to the router, you will need an Internet cable. One end of the wire is connected to the TV’s LAN jack, the other – to a similar router connector. Wireless TV connection will help to install a built-in or external Wi-Fi adapter. The latter is purchased separately, and is inserted into the USB connector. The router to which the devices are connected must support the DLNA protocol. Once the DLNA connection is established, the folders with playable files will be displayed on the TV screen.
Note! For the convenience of displaying and playing media files on TV, it is recommended to pre-sort all the data into folders (for example, by category or artist). You can also use the LCN (Logical Channel Number) function on your TV, which sorts the channels in a convenient order.
Installing and configuring DLNA media server: https://youtu.be/KNbaRai5cAU
Setting up the DLNA function on LG TVs
Additional settings for the DLNA option on TVs from different manufacturers are somewhat different, consider
this process on LG SMART TV :
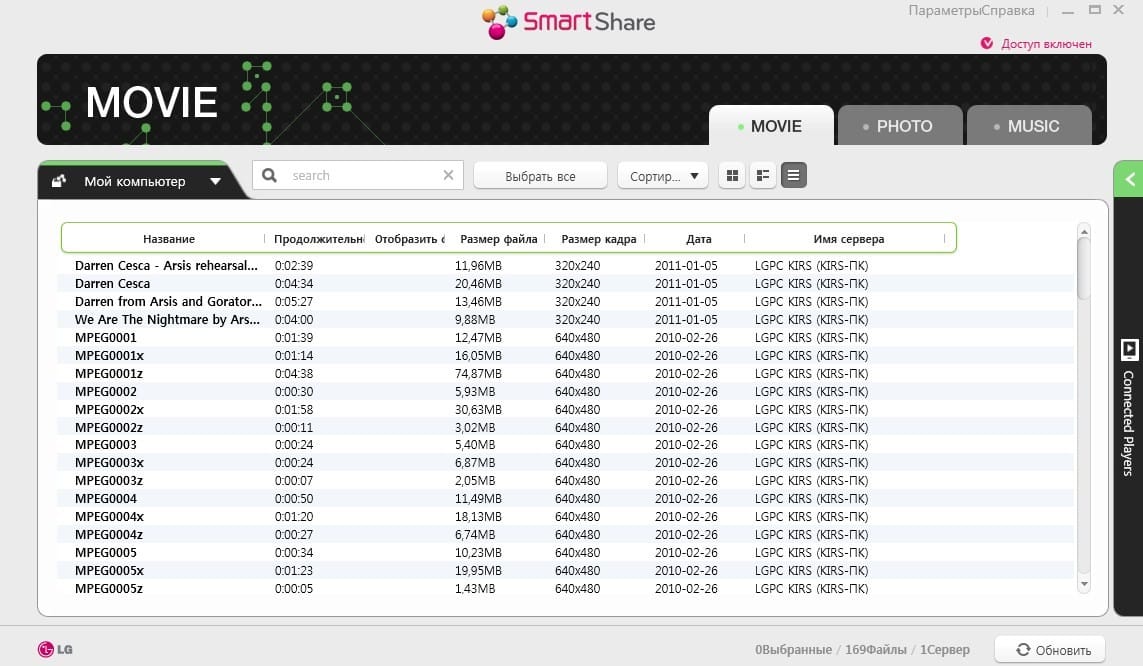
- On the media server from the official website, we download and launch the Smart Share software , which was developed specifically for LG on the webOS platform.

- Install the program according to the suggested instructions.
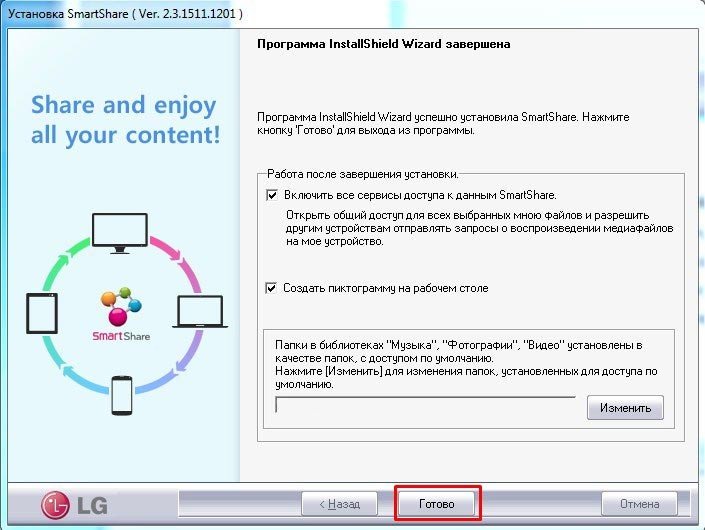
- To complete the launch, click on the “Finish” button, and on any of the icons that appear.
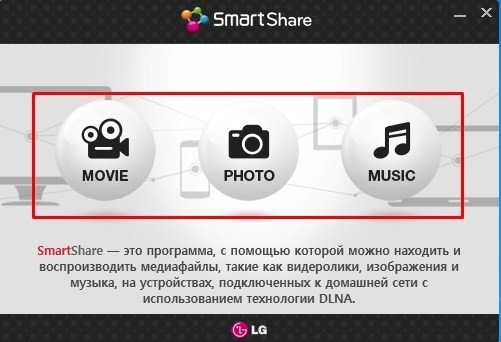
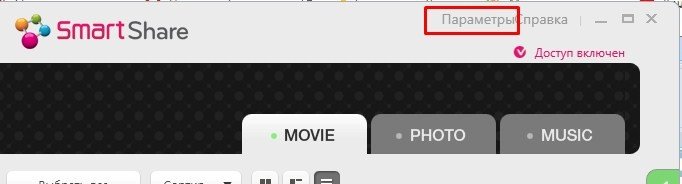
- Go to “Options” in the “Service” tab, and turn on the sharing of allowed files.
- We go down below in “My shared files”, mark the folders for access on TV.
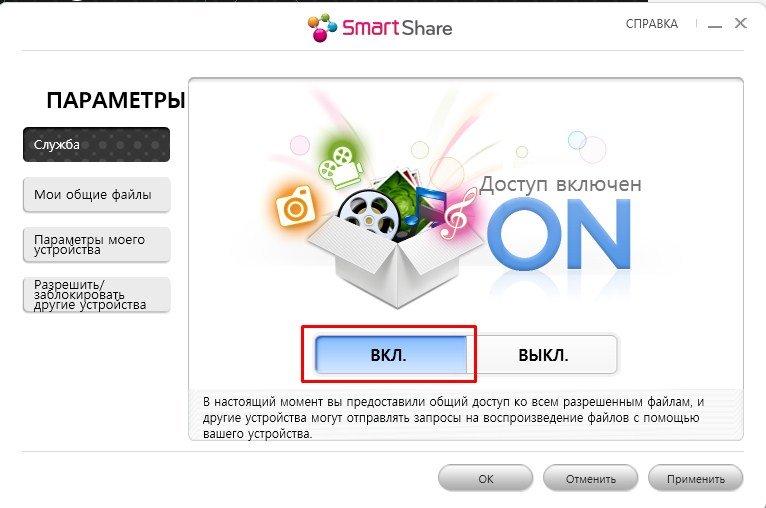
- Next, media content available for playback will open.
To continue playing files on LG, you will need to open the TV menu, go to the “Smart Share” folder, and select the desired files from the list.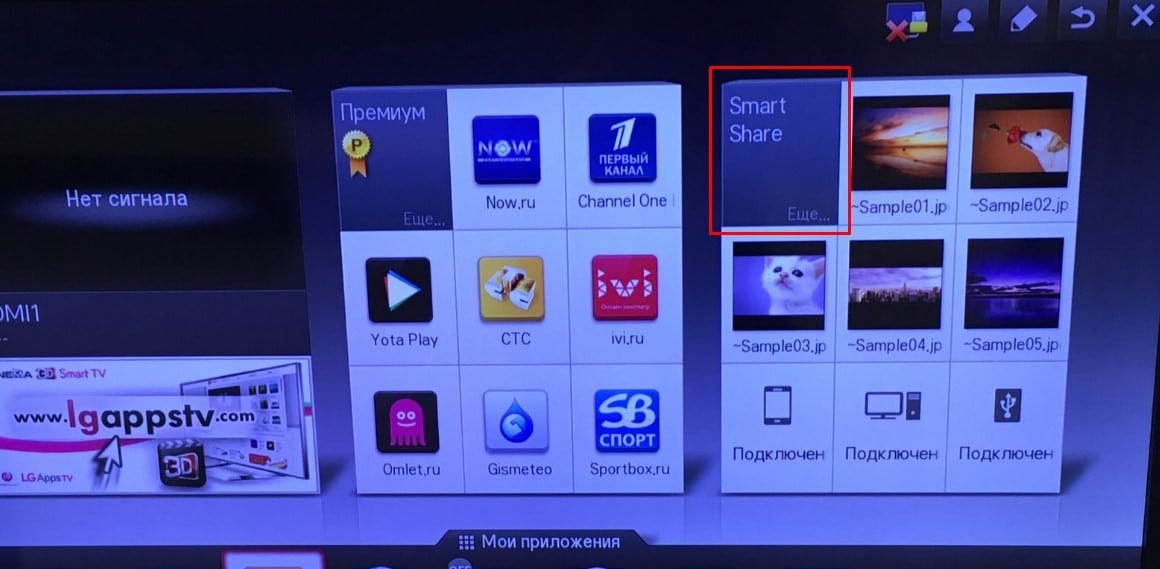 LG proprietary DLNA media server: installation and configuration – https://youtu.be/pWvj6QUQCmo
Setting up DLNA on SAMSUNG TV
Many SAMSUNG smart TVs are equipped not only with the DLNA option, but also with the Plug and Play standard. UPnP also allows devices to be shared across a single network, but offers less flexibility in the choice of content providers. In most cases, UPnP and DLNA devices are compatible. AllShare and PC Share Manager programs have been developed for Samsung based on Tizen. Proprietary PC Share Manager software connects the TV and a computer or laptop into a single network, and also makes it possible to play multimedia data from a media server on TV. The program is compatible with all generations of Samsung TVs with DLNA support. The work of PC Share Manager is configured according to the following algorithm:
- On the computer from the official Samsung website, download and run the software.
- In the explorer, which is located on the left, we find the necessary folders with media files.
- We mark them.
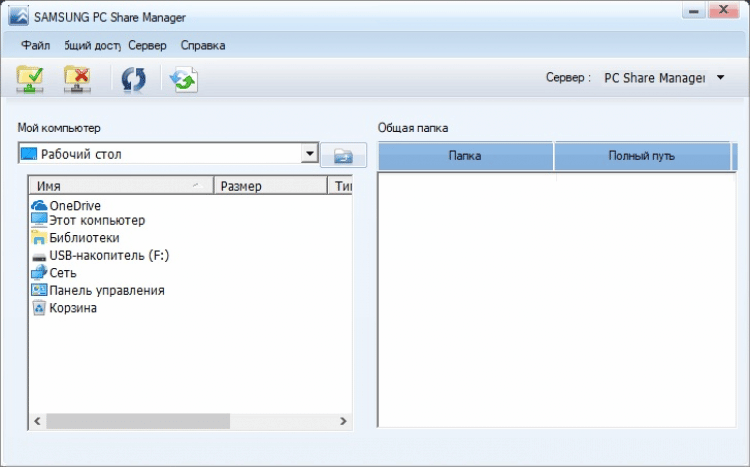
- Click on the folder with a checkmark, which is located above.
- We open the general access to folders: we drag them to the right field; or click on them with the right mouse button, and select the appropriate item in the context menu.
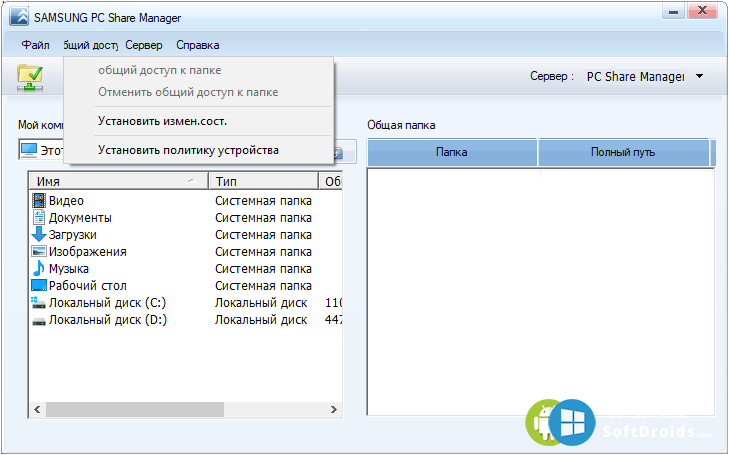
- Next, go to “set device policy”, and in the new window select the desired device, that is, Samsung TV. Click on “Accept” and “OK”.
- Update the connection status: open “Sharing”, and click on “Set Status Changes”.
- We are waiting for the updates to finish.
After completing the setup on the computer, we proceed to work with the TV:
- Open the settings, and go to the TV sources.
- Select PC Share Manager and Share Folder.
- After the manipulations have been done, folders with media files that are on the PC and are available for playback on the TV will be displayed.
Note! The Samsung TV will only display files that are in the photo, music, and movie categories. Media content that belongs to other categories will not be visible.
Setting up via AllShare looks like this:
- Download the AllShare program from the official website to the computer and run it.
- Following the prompts of the Wizard, click on the “Next” button.
- In the window that appears, select the device to connect – Samsung TV.
- We complete the process.
- Go to the folder settings, and specify the general where the files for playback will be located.
- We also set a folder for saving content from other devices.
- The next step is to configure the rights, and allow access to TV.
When working with DLNA, it is recommended to watch video with DivX codec. With this format, the size of media content is significantly reduced without loss of quality.
The DivX codec in Samsung with the smart option is registered as follows:
- In the TV menu we find the section “System”.
- Next, open the subsection “Video on demand DivX”.
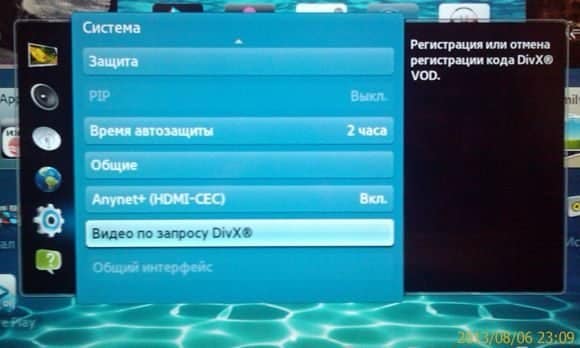
- We go to the official DivX website, and register the device. Here you will need to enter the code, which is located in the “DivX VOD” folder.
- Next, we proceed to work on a PC, and from the official DivX website, download and launch the DivX Player.
- Here we register the device, and complete the process.
Setting up DLNA data transfer on Philips
One of the components of the Smart TV platform in Philips models is the SimplyShare option (https://apkfab.com/philips-simplyshare/com.philips.simplyshare). It connects the TV with other DLNA devices. And allows you to play audio files from iPhone and iPod. Philips TVs 6000 series and above can play other content. These models are equipped with SongBird technology and codecs for format recognition. https://youtu.be/63l4usu6elk Another way to set up DLNA is to use the universal Home Media Server program:
- On the server device from the official site, download and run the above software.
- Next, we move on to setting up access to content on a PC. Expand the “Media Resources” tab, and check the boxes next to the desired drives: local, network or removable. Using the “Add” button, you can provide access not to the entire disk, but only to its individual elements. Click the “OK” button to complete the process.
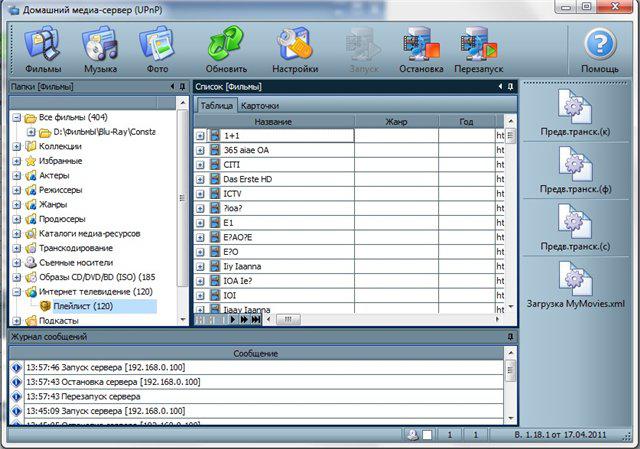
- With the help of the corresponding button, we start the transfer of data to TV.
- In the “Playback Devices” tab, select Philips. In this case, the TV must already be turned on and connected to the Internet.
- We turn to the TV, and on the remote control we press the button “Sources”.
- In the “Sources” window, select the media network.
- We find a PC, expand the folder with files available for playback, and play the content.
Setting up DLNA on Sony branded TVs
You can set up DLNA technology on Sony Bravia branded TVs in different ways. Consider the most convenient option using the built-in Windows Media Player. This method is suitable for a PC based on Windows 8.1 and higher:
- We expand the Start menu, then in the general list of all programs we find and select the desired player.
- We pass to the “Library”, which consists of 3 sections – audio, pictures and films.
- Depending on the type of material that you want to play on the TV screen, go to the “Manage your music library”, “Manage the gallery” or “Manage the video library” section, respectively.
- Here, from the existing list, select a folder for broadcasting. If there is none here, add it manually using the “Add” button.
- Next, go to the “Stream” section, and click on the streaming connection in the homegroup.
- In the window that opens, select Sony Bravia TV from the proposed list of available devices, and click “Next”.
- At the next stage, we configure access to various files and folders.
- After clicking on the “Next” button, the computer will generate a password that may be required to connect other devices to the DLNA network.
Let’s move on to TV.
- Expanding the main menu.
- We find here “Multimedia server” and expand it.
- Select a server device from the proposed list. In this case PC.
- Next, all available media files will be displayed on the screen – select the one you need.
To transfer data from a smartphone, perform the following steps:
- Both devices are turned on.
- On the TV, through the advanced settings, activate Wi-Fi Direct.
- In the “Show Network (SSID / Password)” section, we find and remember the password.
- After the Wi-Fi Direct function is activated on the phone.
- From the proposed list of available devices, select the desired TV, and enter the previously specified password.9
- Next, we transfer data using the Throw command.
When connecting an Apple branded phone, you will need an Apple TV set-top box. https://youtu.be/7HU14zNCWbQ
How to set up DLNA on Xiaomi TVs
To work with Xiaomi as a DLNA client, the same universal Windows Media Player is suitable. The “BubbleUPNP” app (https://play.google.com/store/apps/details?id=com.bubblesoft.android.bubbleupnp&hl=ru&gl=US) on a PC server, or the “VLC for Android” program may also be useful. » to send files from your Android smartphone or tablet. Both utilities are downloaded from the network.
DLNA connection on Windows 10
In Windows 10, you can display any video on the player device in a few clicks:
- Go to the folder with the video file.
- Open its context menu.
- Hover the cursor over the “Transfer to device” column.
- And click on the desired client.
The file has been sent via DLNA for playback. Dlna server in Windows 10 for video streaming: https://youtu.be/evd0Nqc9joc
Working with OS Linux
The recommended program for OS Linux is miniDLNA:
- Download and run the program.
- Expand the configuration file /etc/minidlna.conf. The configurations are standard, we only specify the path to all files and the device to connect to.
After the performed manipulations, open the TV menu, and find folders with media content from Linux.
Setting in MAC OS
To work with MAC OS using DLNA technology, you will have to install third-party software. Best Utilities:
- Elmedia Player Pro (https://www.appstorrent.ru/114-elmedia-video-player.html);
- Serviio Pro (https://macx.ws/mac-os-unix/9624-serviio.html) ;
- FireStream (https://apps.apple.com/us/app/firestream/id1005325119?mt=12).
Each of the programs has its own characteristics. Therefore, the approach to choosing the most appropriate utility is individual, and depends on the purpose of the connection.
Connection errors and their solution
Some users encounter a number of problems and errors when connecting devices using DLNA technology. The most common problem is that the devices do not see each other or do not start. In this case, most likely the answer lies in the Internet connection. You need to make sure that all devices are on the same local network. In the case of working with a smartphone, it is recommended to disable a possible connection to the mobile Internet in advance.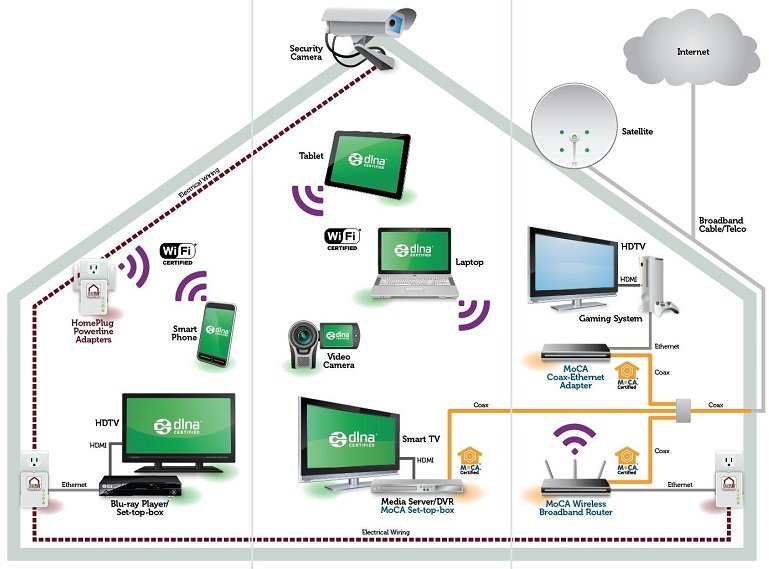 The error may be in an insufficiently high-quality Internet connection [/ caption] Poor-quality playback or knocking out of the program – may be a consequence of the low speed of the switch ports. You can try to solve the problem through the appropriate settings. As you can see, DLNA technology is universal and quite convenient. To connect, it remains only to choose the most suitable connection method, according to your goals and the technical characteristics of the devices.


