The correct setting of the satellite dish has a key influence on the quality of satellite signal reception. Many people are afraid to install a satellite dish on their own, but after reading this guide, this procedure will no longer seem so complicated. Let’s figure out how to position a satellite dish and connect it yourself.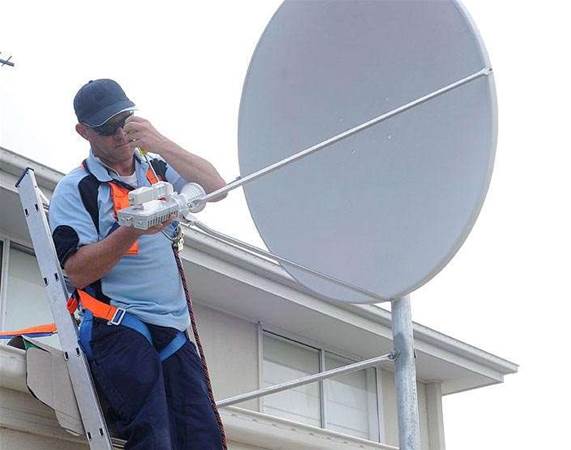
- Materials and tools needed to install a satellite dish
- Satellite dish installation and cabling
- Installation instructions: site selection, calculation of elevation, azimuth
- Signal setting
- Software and programs for PC and smartphones for setting up satellite TV
- How to set up a satellite dish at 75 degrees
- Setting up a satellite dish for 3 satellites Amos, Astra, Sirius Hotbird
- Astra
- Amos
- hot bird
- Tips & Tricks
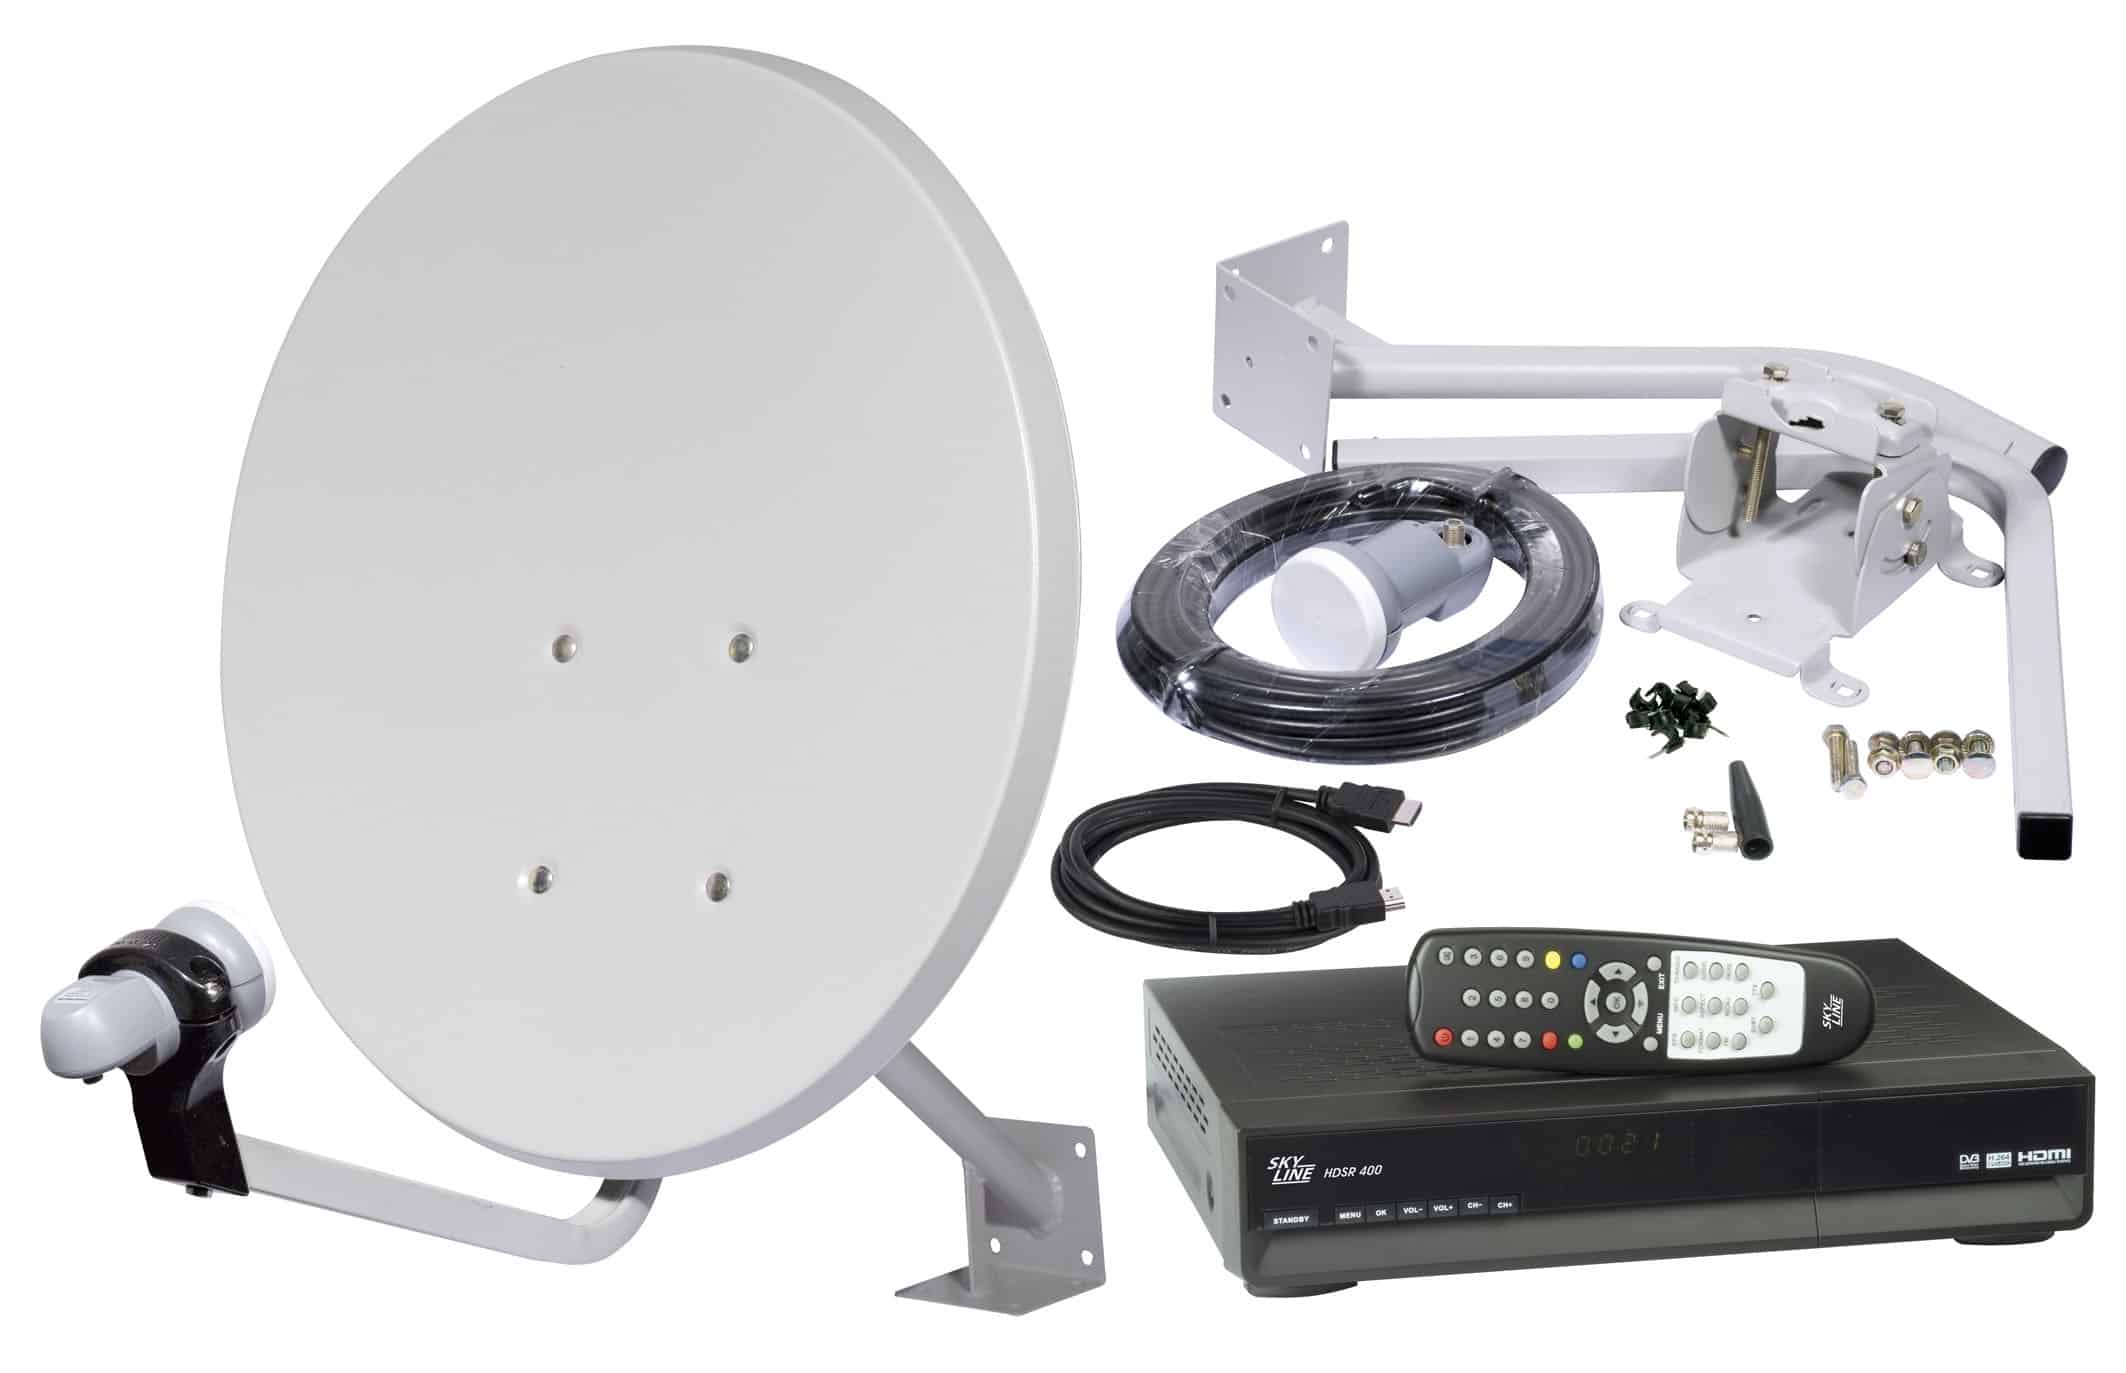
Materials and tools needed to install a satellite dish
You will need:
- Satellite dish with signal converter .
- Antenna mast or wall bracket (sold separately), depending on the technical capabilities and installation location.
- External antenna cable designed for satellite installation (75 ohm impedance). You will need two cables to assemble the Full HD set-top box with the recorder. In the case of installing a multi-room system, a correspondingly longer coaxial cable length will be required.
- Type “F” connectors , corresponding to the diameter of the coaxial cable, wrenches and tools needed to fix the mast.
- Compass, protractor, ruler or related application on a smartphone .
- Cable ties or glue, electrical tape, dowels, lightning protection connectors . If it is not possible to make a hole in a window or wall for cable routing, use a special flat cable with “F” type connectors.
Satellite dish installation and cabling
In stores that sell satellite TV equipment and satellite dishes, you can buy various types of antenna holders that are attached with brackets to a wall or antenna mast.
- Choose the bracket that suits your installation location.
- Attach it as firmly as possible to a rigid base.
Installing a satellite dish using brackets - Buy a quality cable of the right length. It is best to take a length with a margin of at least 3 meters (a cable longer than 30 meters requires a signal amplifier), which will connect the antenna kit to the HD decoder.
Satellite cable - Route and secure the cable so that there is no risk of tripping over it or accidentally damaging it (avoid sharp bends).
- Cut the cable after laying it. .
- If the converter is equipped with a protection to prevent water ingress, put it on the cable before inserting it (converters with a sliding housing do not require protection).
- F-type connectors should be tightly screwed to the coaxial cable, using wire cutters if necessary (it is better to use a special wrench). It is important to carefully prepare the cable and make sure that the metal braid of the coaxial cable does not touch the center wire.
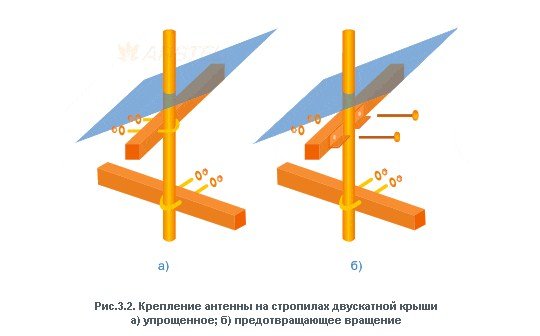
Important: in houses equipped with a lightning protection system, the mast must be connected to it with a copper cable with a cross section of 50 mm² or 80 mm², and external wires must be connected to the mast with a cable with a cross section of 40 mm². But these requirements are not necessary if the antenna is located less than 2 meters above the roof and closer than 1.5 meters to the wall from the house, that is, on the balcony.
Installation instructions: site selection, calculation of elevation, azimuth
Russian
satellite TV operators are divided into two categories – southern (which includes NTV-plus and Tricolor TV) and eastern (Telekarta,
MTS ). In this case, we will give an example of installing a southern antenna. More about
setting up a satellite signal from MTS in our material.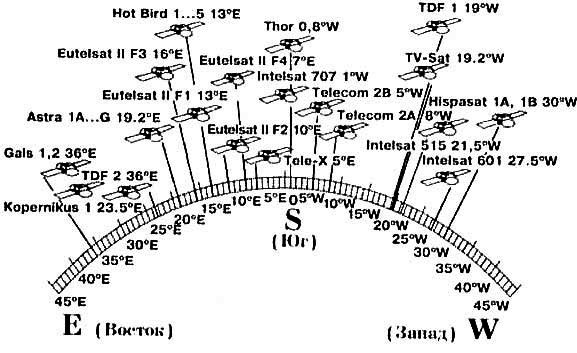
- azimuth is the angle between north and the desired direction;
- angle of inclination/elevation – the angle of orientation of the dish in the vertical plane;
- elevation angle – the horizontal angle corresponding to the left-right rotation of the dish;
- converter rotation – the angle at which the antenna looks in a given direction of the world.
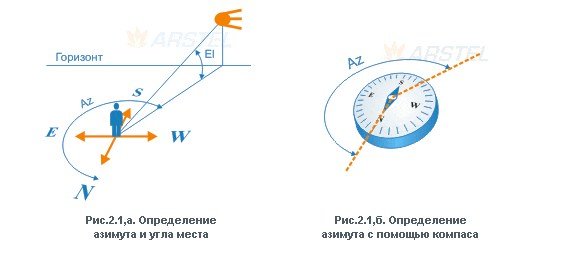
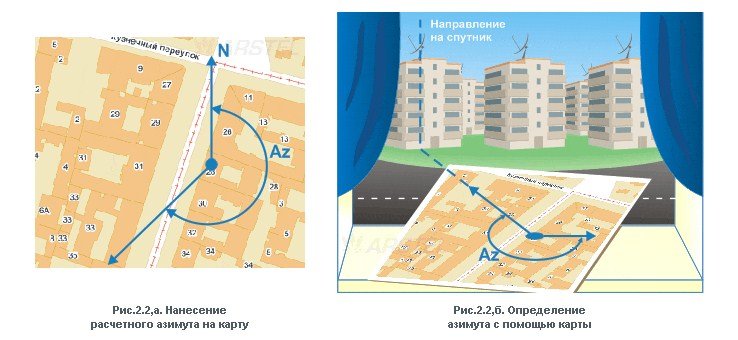 The azimuth is set by the compass and is counted in the direction of the clockwise direction. Antenna direction angle (azimuth – 180º) is measured from the south clockwise.
- use the mounting bolts to fix the converter in the bracket;
- fix the antenna on the mast and adjust the angle;
- screw the wires to the converter and to the receiver;
- connect the set-top box to the TV according to the instructions and start it.
Installing, connecting and self-tuning a satellite dish – video instruction: https://youtu.be/rjr8tuz2DB4 You can fine-tune the position of the satellite dish based on the results of measuring the received signal. A special counter is not needed for this. Modern decoders have sufficient functionality to measure the signal received from the satellite.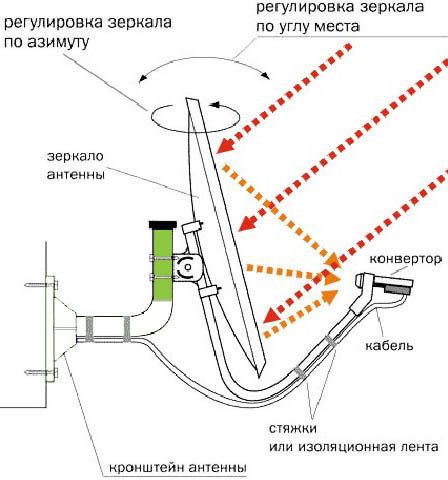
Signal setting
The signal quality indicator is critical. When positioning the antenna, you should be guided by the maximum value of the quality parameter, even at the cost of reducing the signal strength. If you find the position of the antenna with the highest signal strength and zero quality, it means that the antenna is pointing at another satellite. In this case, you should continue searching by first changing the direction of the antenna. After finding the desired satellite, adjust the converter setting for the best quality. Setting up a satellite dish:
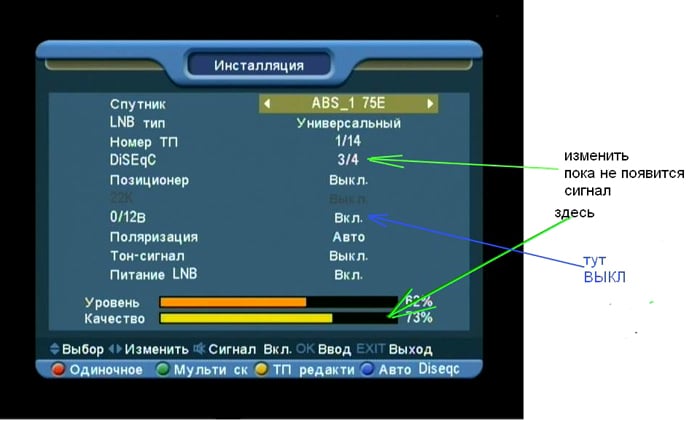
- After connecting the device, the start screen will appear on the TV screen indicating the signal levels (if not, it can be opened by pressing F1 on the keyboard or I on the remote control). Usually these are two parameters: signal strength / power and quality (these parameters are also displayed on the displays of some set-top boxes).
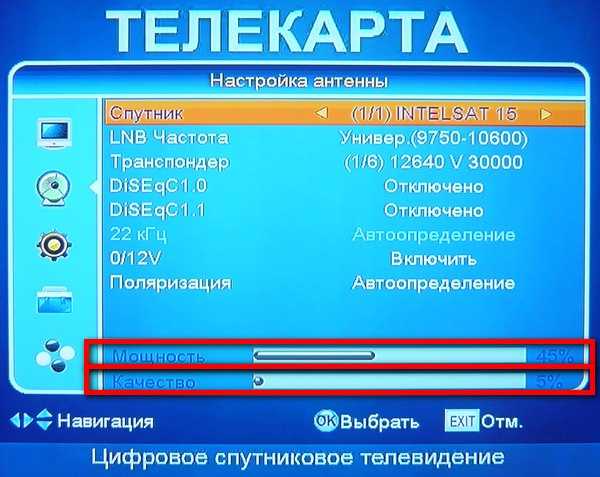
Signal quality - The force parameter must have a value greater than zero. For example, it can be 50%, depending on the type of converter and the length of the antenna cable, which confirms the correct connection. The quality parameter for the first time will most likely be at zero, because “hitting” the satellite in the initial settings is unlikely.
- To fine-tune the signal, you need to manually rotate the antenna by 2-3 degrees in the horizontal plane, monitoring the signal level, and then move the converter closer and further away from the antenna, observing the signal quality indicator. After that, it is necessary to tighten the screws securing the antenna to the mast (they must be screwed in one by one, controlling the signal parameters so that the deformation of the antenna fasteners does not change its position). The antennas are attached to the mast with two screws, and after tightening them, additional tilt angle correction may be required.
- The process can take some time, so it’s best to have two people doing this – one turns, the other watches the signal level change. The optimal signal level for normal video playback is from 70%. After that, start the automatic search for TV channels and save the settings. Even if the antenna fails, you do not need to repeat the procedure again.
An important point: in the factory state, many decoders automatically activate the boot procedure after startup. If there is no signal from the satellite, the first startup process will stop at the settings screen with the results of the signal measurement, or it will be preceded by the antenna installation selection screen. If the decoder has already been launched before (for example, at the dealer’s office to check its operation), the launch procedure will stop at the screen already mentioned above with the parameters of strength and quality.
Software and programs for PC and smartphones for setting up satellite TV
Satellite Antenna Alignment With this free PC program, you can easily and easily calculate the azimuth and elevation angle for a satellite dish. Working with the program is very easy. Having launched the program, simply enter the latitude and longitude of your house in the “Antenna installation site coordinates” section (you can find out by opening Google maps and entering your address). The azimuth and elevation angles for all possible satellites will be displayed on the left side of the screen. Find the satellite you need and use the received coordinates. The program can be downloaded for free here: https://satellite-antenna-alignment.ru.uptodown.com/windows. Advantages:
- many settings;
- completely Russian-speaking;
- works in all parts of the world.
Cons: outdated interface.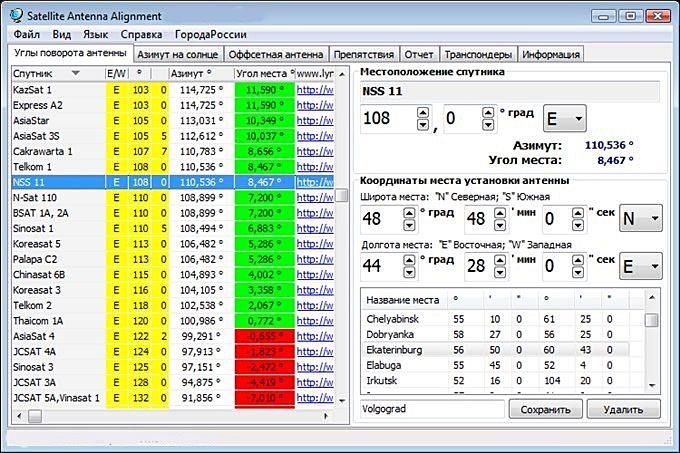
SatFinder A similar free smartphone app is called SatFinder. It allows you to set up a satellite dish using GPS navigation and works in two modes:
- In camera mode.
- In the “sight” mode.
In the first case, the location of the satellites is automatically displayed on the phone screen in the form of a special arc. All that is required of you is to correctly direct the antenna. In crosshair mode, the app will guide you with coordinates and arrows that will change as you move the antenna. If it is directed exactly at the satellite, the arrows in the application will turn green. The app can be installed for free from the Google Play Store https://play.google.com/store/apps/details?id=com.esys.satfinder&hl=ru&gl=US.
- two satellite search modes;
- instant location determination via GPS;
- user-friendly interface.
Cons: None found.
Dishpointer Pro Good alternative smartphone app. It is paid, but is considered one of the best applications for setting up satellite dishes in the world. It can be purchased for Android from the Google Play Store https://play.google.com/store/apps/details?id=satellite.finder.comptech&hl=ru&gl=US. Advantages:
- high-precision determination of satellites;
- finding the user even in conditions with a poor GPS signal (using data from a mobile operator).
Flaws:
- the application is paid;
- menu in English.
https://youtu.be/lRLpKZMCRHo
How to set up a satellite dish at 75 degrees
Consider as an example the process of setting up a dish for an ABS 75E satellite. Initially, we need to determine the azimuth (antenna direction):
- We open Yandex-maps, enter the name of the locality in which the installation is being performed. Take the coordinates from there and copy.

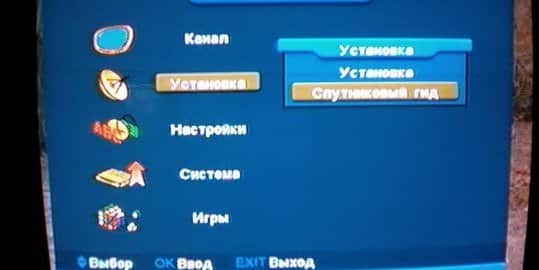
- Turn on the receiver and in the tab “Satellite guide” enter the coordinates and click “Calculate”
- Now we know the azimuth and tilt angle of the antenna. We determine the direction using a compass and fix the plate on the bracket.
Now you need to configure the signal:
- We turn on the tuner and in the “Installation” section we find the ABS 75E satellite.
- We return to the antenna and begin to slowly move it up and down until we catch the signal from ABS 75E. Then we scan the channels.
Installing and configuring satellite dishes on ABS 75E, not Russian, but everything is intuitive: https://youtu.be/rkBsqsKXkgc Once the signal is caught and the channels are found, you can fix all the screws and connect the dish to the tuner.
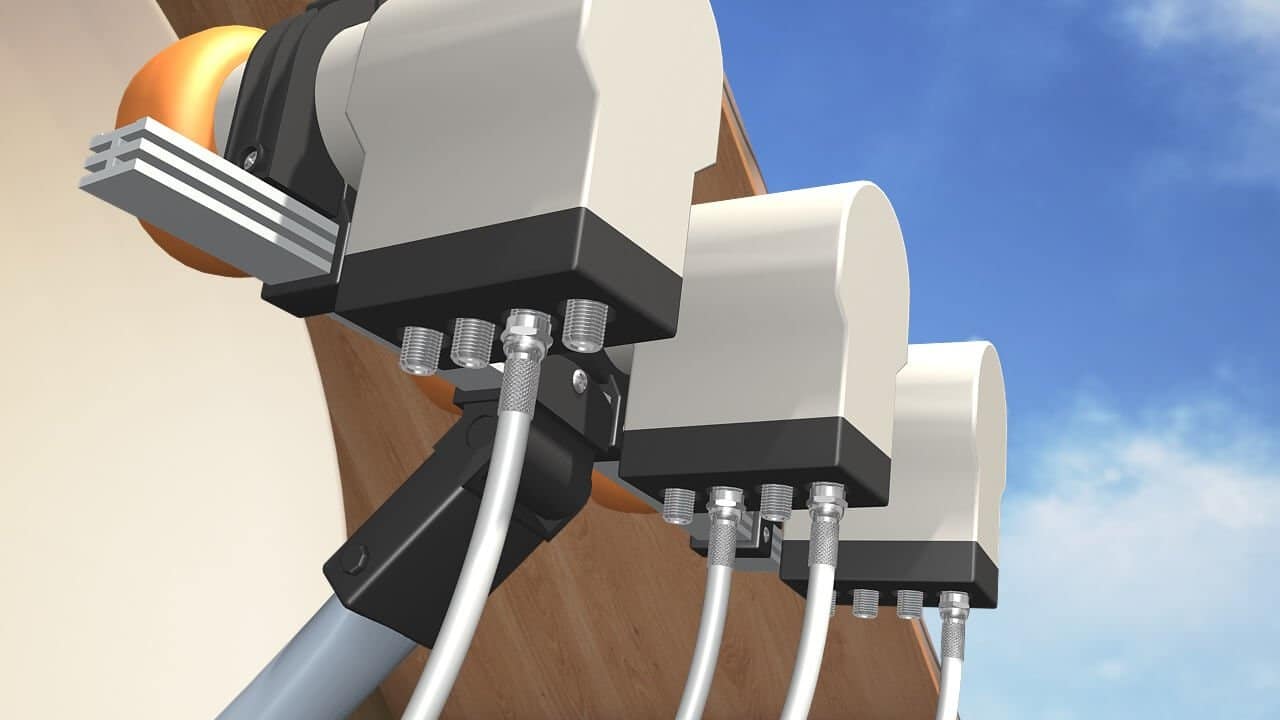
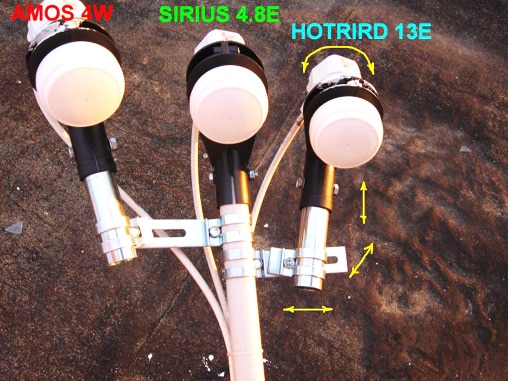
Setting up a satellite dish for 3 satellites Amos, Astra, Sirius Hotbird
The installation of satellite television from three satellites will allow you to watch many free Russian-language TV channels (more than 90) and a huge number of foreign ones (more than 2 thousand). Standard equipment:
- satellite antenna,
- three converters for Ku-band;
- two plastic mounts for side converters;
- antenna masts or brackets;
- DiSEqС (Diseka)-switch of converters;
- F-type connectors;
- coaxial cables 75 ohm.
Astra
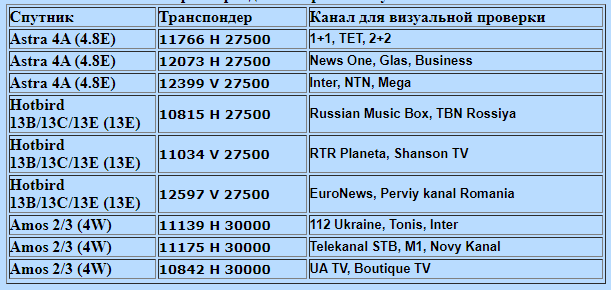
- H – horizontal polarization;
- V – vertical polarization;
- position – 4.80 E;
- frequency – 11.766 GHz;
- symbol rate (S/R) – 27500;
- error correction (FEC) – ¾.
The antenna must be oriented to the location of the satellite. When doing this, you must make sure that the antenna is pointed at the correct satellite. To check, you must enter
the transponders listed in the table and turn on any channel. If no channels appear as a result of the scan, then the antenna is not configured correctly and the tuning must be done again.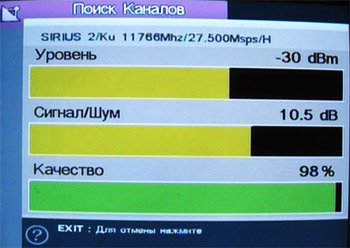
Amos
Setting up the Hotbird and Amos satellite is that you need to find the correct position of the converter relative to the central one. To do this, you must move it horizontally and vertically until you find an acceptable signal level.
- position – 13E;
- frequency – 10.815 GHz;
- symbol rate (S/R) – 30000.
hot bird
Connect the cable to the converter, then open the tuner menu and set the following parameters:
- position – 4W;
- frequency – 11.139 GHz;
- symbol rate (S/R) – 27500.
Then connect the DiSEqC to the appropriate converter and set the port numbers for each satellite in the tuner. For example, in our particular case:
- the first port is an Astra satellite;
- the second port is Amos;
- the third port is Hot Bird;
- the fourth port is free.
Tips & Tricks
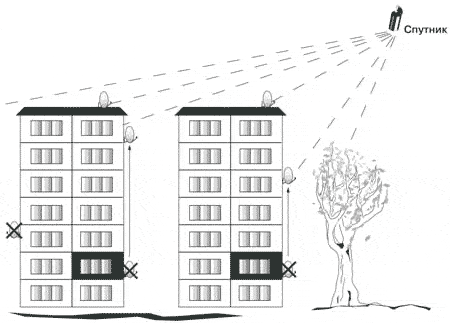
Choose a location to install the antenna – it should provide a view of the sky to the south. Check if any of your neighbors use satellite TV. If so, point the antenna in the same direction as him. It should be directed to the Eutelsat 36B satellite and/or Express-AMU1. It is important that there are no obstacles blocking the signal (wires, trees, buildings) on the way from the antenna installation site to the satellite. The procedure for installing a satellite dish will be easier if you:
- take a second person as an assistant.
- the antenna installation site is within walking distance;
- the premises are your property, or you have permission to install an antenna system from the building manager;
- The distance from the antenna to the decoder is short (no more than 30m) and there are not many obstacles such as walls or windows on the way.