
Wanting to watch movies on a big screen, or in the absence of a TV, users are wondering how to connect a TV to a computer or laptop via HDMI output running Windows, Linux or iOS. Also, this connection method is used to connect a gamepad, work with documents or surf the Internet.
- How to connect a TV to a computer via an HDMI cable under Linux
- Connecting a TV to a computer via HDMI under MacOS
- How to connect a TV to a computer via HDMI running Windows XP, 7,8,10
- How to connect a TV running Android, Tizen OS
- Possible problems and their solution – the TV does not see the PC via HDMI, does not output video, or does not transmit sound
How to connect a TV to a computer via an HDMI cable under Linux
Connecting a TV to a computer via HDMI should start by checking the availability of the appropriate port on the TV device. Almost every model is now equipped with one or more of these connectors. In a computer, the HDMI output is located on the back cover of the system unit. This interface is very convenient due to the fact that not only the picture is displayed, but also the audio.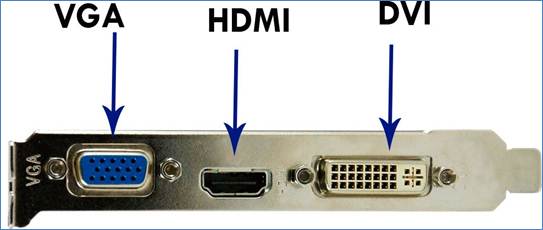
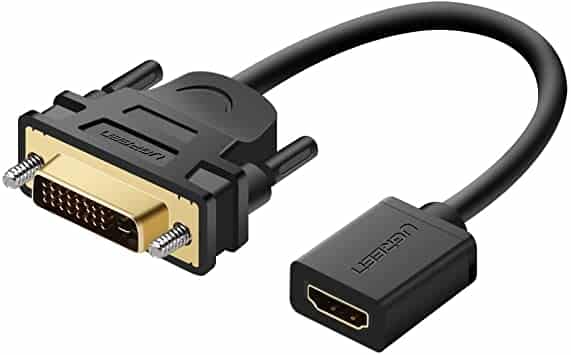
Owners of older devices are wondering how to connect a computer to a TV without an HDMI connector. If there is no such connector, you can use DVI or VGA for the connection. However, they provide lower image quality. Then you can use a special DVI-HDMI adapter.
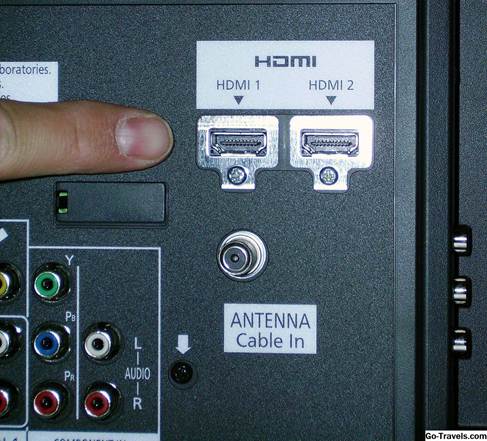
- Find the HDMI input on your TV device . It is usually located on the back or side panel. On some models, these inputs are present in both places. Ports must be appropriately labeled and numbered. If there is at least one such connector on the TV, then the connection will be successful.
- Now you should start looking for an HDMI output on the PC system unit . By inserting the end of the cable into the connector, both devices can be turned on.
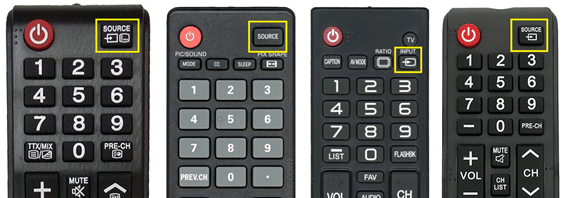
- In this case, the message “No signal” often appears on the TV screen . This means that you need to select the desired source. There is a dedicated button on the remote control to switch between ports. Depending on the model, it may be called “Input” or “Sources”.
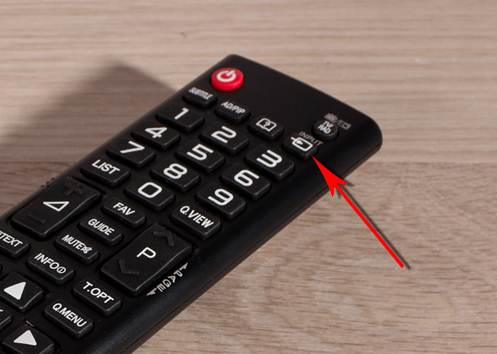
- After clicking on this key , a menu will appear prompting you to specify the desired signal source . To select the correct port, you can check its number on the TV panel. Or immediately click on the active source.
- After that , a picture transmitted from the PC monitor should appear on the TV screen . You can then change the image output mode as you like.
To configure the audio of a Linux PC, it is recommended to use the Pulseaudio Volume Control software. You will need to hold down the combination “Alt + F2”, type “pavucontrol” and click on “Enter”. After the window appears, go to the “Configuration” tab. Then select “Digital Stereo HDMI Output” from the drop-down menu. This will redirect the sound to the TV’s audio system.
Connecting a TV to a computer via HDMI under MacOS
Modern Mac computers are equipped with an HDMI 1.4 or later port, so you can connect directly to your TV. If this connector is missing, an adapter must be used. For example, models released before 2015 are equipped with a Mini DisplayPort interface. If you plan to use the TV screen as an external monitor, then you need to connect the devices via an HDMI cable. After that, you need to go to the choice of the Macbook operating mode. An image can be duplicated, the desktop extended, or a job started with the lid closed. Selecting the first option, you need to check the box next to the line “Enable video repeating monitors.” Connecting an HDMI cable from a computer to a TV is quite simple to implement – you need to take such a cable and insert both ends of it into the appropriate connectors on the system unit and the TV panel. On Windows, there are various display modes of the picture. After connecting the wire, the computer recognizes the TV set as an external monitor. [caption id="attachment_9276" align="aligncenter" width="800"]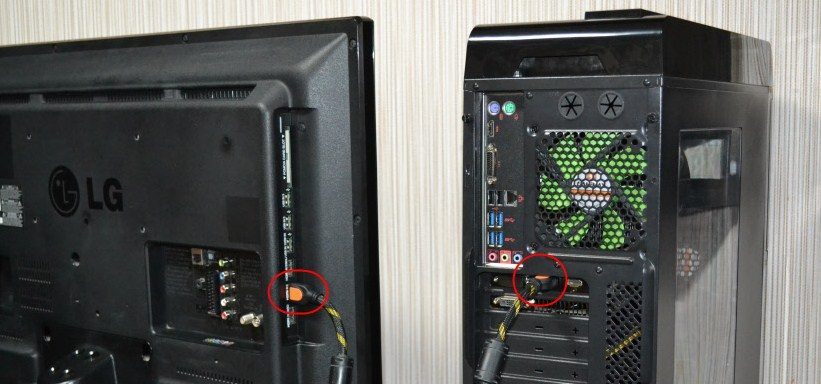
How to connect a TV to a computer via HDMI running Windows XP, 7,8,10
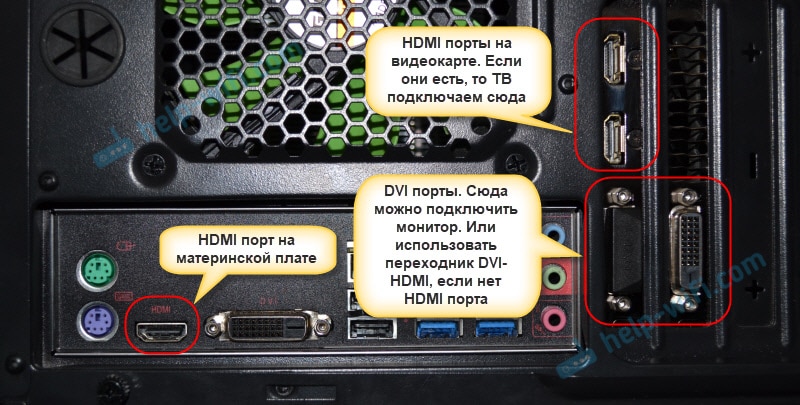 Where can HDMI ports be located on a computer to connect to a TV
It is important to switch off and disconnect the devices before connecting them. This will avoid port failure.
Next, you should decide on the purposes of using the monitor. If it will be used as a second screen, then you should adhere to the following plan of action:
- Disconnect both devices from the power supply.
- Insert one end of the wire into the HDMI port on the PC and the other end into the TV panel.
- Turn on the TV and computer after connecting the cable.

- On the remote control, select the required source of the transmitted image using the “Input” or “Source” key.
- The same image should appear on the TV screen as on the computer monitor. If there is no signal, you need to make sure that the correct port is selected.
On older PC models, the monitor may not have a digital interface. Then the question arises of how to connect a VGA computer to an HDMI TV. It is worth noting that analog ports can only output a picture. Therefore, to reproduce the sound signal, you will need to use a mini-jack to connect the speaker system. Owners of older monitors will have to purchase an HDMI-to-VGA signal converter. Some adapters have a 3.5mm audio plug. You can also use “tulips” to transmit sound.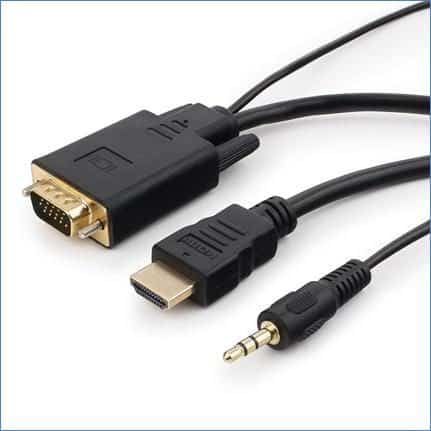 After connecting with an adapter, you will need to configure the connection. To do this, use the “Input” key, which allows you to switch to the appropriate signal source. If the connection is successful, then what is happening on the PC desktop will be displayed on the TV screen. If the picture is not displayed on the entire display, it is stretched or compressed, you should adjust this parameter by going to the “Screen resolution” menu. In the “Screen” tab, you should set the maximum allowable value for your TV. Setting up a laptop and computer when connected via HDMI to a Windows TV: https://youtu.be/R8HbJr36WE8
How to connect a TV running Android, Tizen OS
Connecting a 4K TV to a computer via HDMI can be done if the TV set and video adapter on the PC support Ultra Full HD resolution. This allows you to display a high quality image. To get it, you will need to select a resolution of 3840Ⅹ2160 in the settings. But to display such a clear image, you need a powerful video card. In this case, the refresh rate should be set to at least 60 Hz. You can also change the scaling in the options so that the image expands to full screen. An example is the LG TV. Depending on the year of manufacture, your computer may not have an HDMI port. In this case, you will have to additionally acquire a USB-C or DVI adapter. To connect the monitor to your TV device, follow these instructions:
- Connect the cable to the TV receiver. If the model has more than one connector, it is recommended to look at its number. This will help in the future to correctly determine the source of the signal.
- Insert the other end of the connector into the appropriate port on the computer.
- Click on the “Input” button using the remote control.
- Now you need to switch to the connected signal source. For example, it might be listed as HDMI 1 in the menu.
- After that, you should select the TV device as the source for playing the audio signal if the sound comes from the computer’s speakers.
To do this, open the “Start” menu on the PC, then go to the “Sound” section. On the “Playback” tab, select your TV receiver model. Then click on the “Default” button and confirm the action by clicking on “Apply”. On television devices from the manufacturer Samsung, the cable connection is carried out in a similar way. However, you must use the Source button on the remote to select a source. To connect a Samsung TV to a computer via HDMI, just connect them with a cable and go to the menu to select the active playback source.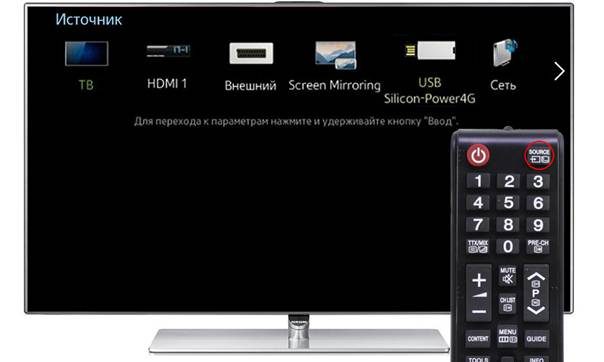 By default, the image is duplicated on the second monitor. If desired, you can change the display mode by configuring this setting on your computer. The projection mode settings window is called up by pressing the Win + P combination. How to connect a TV to a laptop or computer via HDMI running Windows 7 8 10 and set up the connection: https://youtu.be/CplHMfLcElY
Possible problems and their solution – the TV does not see the PC via HDMI, does not output video, or does not transmit sound
If the picture on the TV display is not broadcast in full screen, or goes beyond the frame, it means that the resolution is set incorrectly. Although this setting is usually configured automatically. This applies when both a monitor and a TV device are connected to the computer. To adjust the optimal resolution, right-click on the desktop. In the “top ten” this item is called “Screen Settings”. A window will pop up showing how many screens are connected to the PC. Each is assigned a specific number – you can calculate it by using the “Define” button.
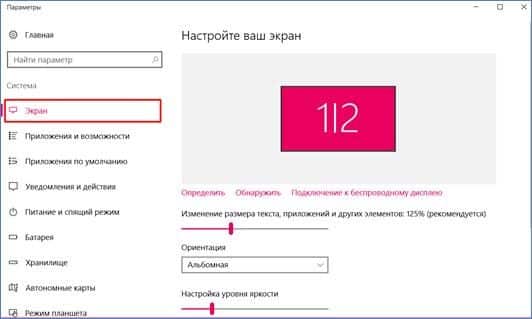 If you go to the “Advanced screen settings” item, you can reconfigure the resolution and adjust the color reproduction. It also sets the screen refresh rate.
 If you want to expand the screen or duplicate the image, this can be done through the settings on the computer. The easiest way to change the display mode is to use the key combination “Win + P”. It can be used on any version of Windows OS. After clicking on these buttons, the “Project” window will open. It has several display modes to choose from. If you use the item “Only computer screen”, then the image on the TV will go out.
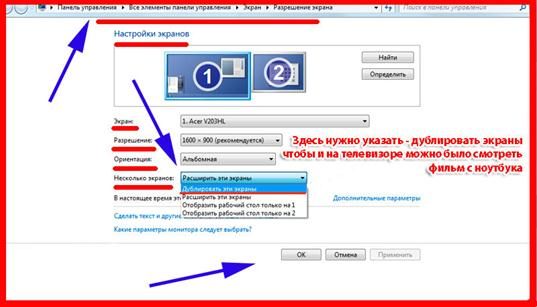 When using the “Repeating” mode, the picture will be duplicated on the monitor and TV screen. In this case, inconsistencies with the specified resolution may occur if it is different on these devices, for example, 1366Ⅹ768 and 1920Ⅹ1080. By selecting the “Expand” mode, you can use the TV as a second monitor. The image will move from one screen to another. Second Screen Only gives you the option to turn off your computer monitor. The picture remains on the TV display. Another problem is that some laptop models are endowed with a Micro HDMI connector. This is a smaller version of the interface designed for more compact devices. Therefore, to connect, you will need to purchase an adapter or a Micro HDMI-HDMI cable.
 Sometimes it happens that the video is broadcast, but there is no sound. It either does not exist at all, or audio is played from speakers connected to the PC. If you want the sound to be heard from the TV receiver, then it is recommended to check the volume level and whether the “Mute” key on the remote control is pressed. Next, open the “Playback devices” section on the PC. The TV model should appear in the list that appears. In the window that appears, select the name of your TV.
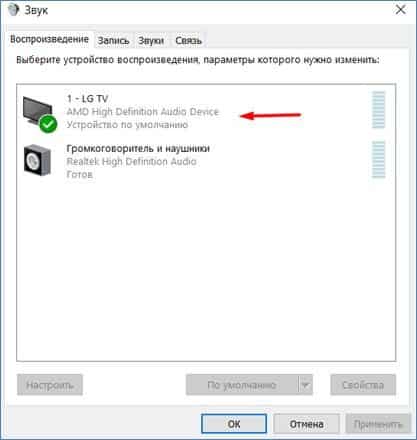 By clicking on it with the right mouse button, you should select the value “Use by default” in the menu that opens. After clicking on “OK”, the playback device should change, and the sound will begin to come from the speakers of the TV receiver. Once the cable is disconnected, audio will be streamed from the PC speakers again. If the TV is not displayed in the window, you will need to right-click on an empty area. Then tick “Show disconnected devices” and “Show disconnected devices”. The name of the TV receiver should appear in this menu.
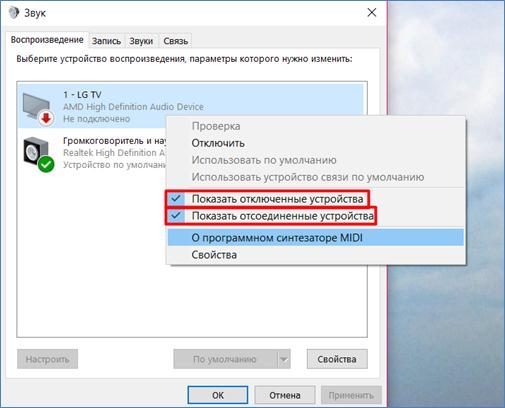 If this method does not work and the TV shows no sound, you can try reinstalling the video card driver and audio adapter. It is enough to download the new version and start the installation process. To do this, visit the developer’s website and find your model there. Or use the auto search function with a connected TV. You can also use the DriverPack Solution utility to download the required updates. Some TV owners have experienced an issue with the High Definition Audio controller disabled. To fix this, you need to go to the “Device Manager”, and in the window that opens, expand the line “System Devices”. Then find “Microsoft High Definition Audio Controller” and check for icons next to its name.
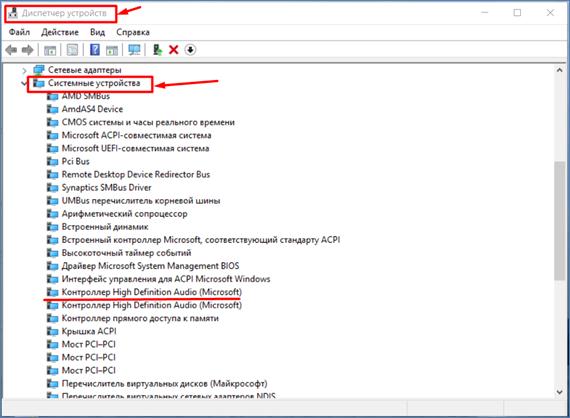 If any are found, you should right-click and try to turn on the device. To check its status, you need to open the “Properties” item. It should say that the controller is working properly. After that, it is recommended to restart the PC. Also, it’s worth checking the “Sound, game and audio devices” tab. The drop-down list will show an AMD High Definition Audio Device or NVIDIA video adapter, depending on the built-in device.
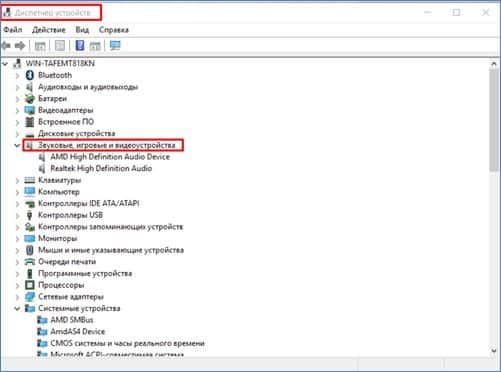
Another option why the sound does not work when connected via HDMI can be searched in the “Audio inputs and audio outputs” column. The TV connected via cable should be displayed there. If the adapter is disabled, you must use the “Enable device” function.
If the sound does not appear, you can use the “Delete” button. Then click on the line “Update device configuration”. This procedure should reinstall the sound adapter, which should resolve the audio issue. It is important to choose the cable of the optimal length in order to avoid kinks or breaks. After a wired connection between two devices, small flickers may appear on the TV screen. However, this is evidence that the TV has been connected to an external source. If the computer does not see the connected TV via HDMI, you need to double-check that the correct port number is selected for displaying the image on the TV screen, and also make sure that the cable is tight and in good condition. In addition, it is worth checking that the “Turn off the projector” option is not selected in the projection mode. If the above methods do not help, you should use the built-in troubleshooter. Running diagnostics will help you find problems with your audio device. To do this, you need to go to the “Control Panel” and select “Troubleshooting”.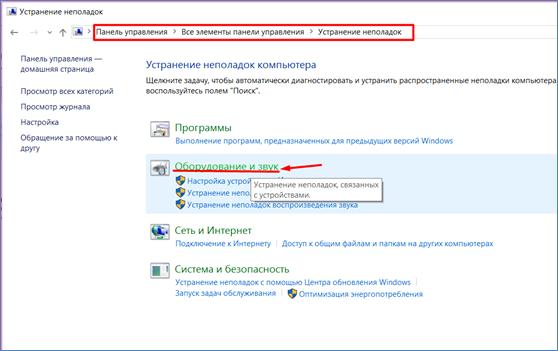 Next, go to the “Sound playback” section. A window will appear showing the troubleshooting process. If there are any, the module should fix them. Bluetooth turned out to be the next source of the problem of non-working sound. Therefore, after connecting the monitor to the TV receiver via HDMI, it is recommended to disable the wireless connection module. To deactivate Bluetooth, you need to go to the “Notification Center” on your laptop. What to do if the computer does not see the TV when connected via an HDMI cable: https://youtu.be/Sdkn4fjswM8 It is important to note that the sound will be transmitted through the TV speakers if you use an HDMI cable version 1.4 and later. Because the 1.3 specification does not support audio output. Therefore, you will need to insert the connector into another port labeled HDMI IN.


