
If you do not want to buy a
DVB-T2 antenna for digital TV, you can make it yourself using improvised means. Since there is no design that could function successfully in different conditions, you need to choose the most suitable version of a home-made device, depending on the specific situation.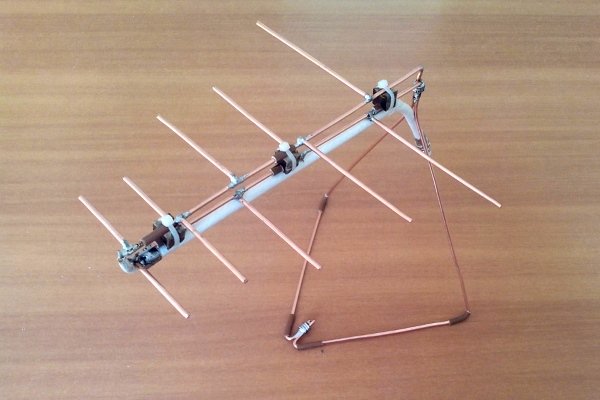
- Simple antennas
- “Tin” (can) antenna
- “A loop”
- Antenna out of the box
- Z-antenna – decimeter antenna for digital television DVB-T2
- Antenna-eight
- Three-piece or four-piece wave channel
- Double (triple) square
- Antenna DVB T2 “Butterfly” (“Moth”)
- Manufacturing using a soldering iron
- Bolted
- N. Turkin antenna for digital television reception
Simple antennas
If there is an urgent need to build a DVB T2 antenna, and the list of available materials is limited, you can assemble an elementary device yourself.
“Tin” (can) antenna
It is assembled simply and quickly. Good reception requires a high-quality signal without obstacles. The greatest effect can be obtained in suburban areas and small towns. For manufacturing you need:
- beer cans – 2 pcs.;
- screwdriver, bolts, screws;
- plug, cable;
- copper wire (small piece);
- scotch tape or electrical tape;
- wooden sticks – 2 pcs.
For the antenna, it is necessary to make a cross-shaped frame from wood. Then we do the following:
- We make holes for the bolts in the middle of the bottom of the cans.
- We remove the cable insulation without affecting the outer contour, equal in length to three jars + another 20 cm.
- We stretch the cable through one hole to another, setting the cans with their necks in parallel. We fix the cable at the end with a bolt or self-tapping screw.
- We fix the cable from the hole and its bare part between the cans and the wire.
- We fix the cans with tape or with insulating tape (one turn is sufficient) to the frame strip, located horizontally.
- We attach the plug.
Do not damage the cable when bending, otherwise a good signal will not be obtained. Don’t skimp on the bare section of the cable – you have a margin of 0.2 m.
Now we determine the required interval between the jars. We connect the plug and move them along the bar until a stable signal is obtained. As a rule, the greatest effect is achieved at a distance of 7 cm from one jar from another. After that, we firmly attach them to the contour. If the antenna is used outdoors, cover it with polyethylene or make a plastic frame. You can attach the device to a hook. If more than 2 cm of bare cable remains at the exit from the hole, wrap the excess section with insulating tape. How to make a simple antenna from cans is shown in this video: https://www.youtube.com/watch?v=kt8u3U-Hp8g
“A loop”
The active part is a TV cable. This antenna is made like this:
- Disconnect the cable from the faulty antenna.
- We clean up the end.
- We measure 0.4 m, remove the insulation by 20 mm, trying not to harm the outer circuit.
- The bare area and the segment that was cleaned are firmly fastened in parallel with wire.
As a result, you should get a circle (a little more than 0.15 m in diameter) from the cable as a receiver. After that, measure 40 mm in the center opposite the side of the attachment point and remove the insulation. The antenna can now be used. The disadvantage of the device is its noise, since the cable end is open. But for temporary use, such an antenna will do. How to make a simple loop antenna out of a cable is shown in the video below: https://www.youtube.com/watch?v=XdD3nANJbQY
For such an antenna, you definitely need a T2 tuner, or the TV must have a built-in T2.
Antenna out of the box
The starting material for the manufacture of the device is a cardboard box. From it we cut out 2 rectangles 0.25×0.3 m.It is also necessary to prepare:
- TV cable with plug;
- bolts, nuts (2 pcs.);
- screwdriver, razor blade;
- wire (preferably copper);
- edible paper or foil;
- glue (clerical will do).
Cut out 2 squares from food paper (the perimeter should be like cardboard blanks). We glue them firmly to the cardboard blank. Remove the remnants of the glue.
Avoid gaps and protrusions when applying foil to cardboard, otherwise the reception quality will be poor.
The made squares will become the receiving part of the antenna. Now we connect the cable. With a blade we make holes for the bolts – at the corners of the squares (adjacent sides). Then we draw the inner contour to one of the holes, and the outer contour (metal casing) to the other. We fasten the contacts with bolts. We find a stable reception by connecting the cable to the TV. Move the squares while keeping the adjacent sides parallel. Having found the required distance, we attach the squares to the frame. Watch the video for step-by-step instructions on how to make such an antenna: https://youtu.be/gwqKRAePtZw
Use the device only as an
indoor antenna , as the foil does not withstand external influences.
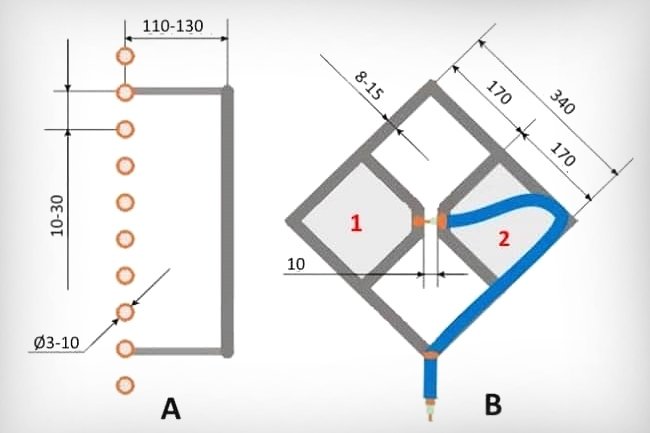
Z-antenna – decimeter antenna for digital television DVB-T2
This homemade device is also called “Square”, “People’s Zigzag”, “Rhombus”. The figure below shows a simplified version of the classic zigzag. To increase the sensitivity, it is equipped with capacitive inserts (1, 2) and a reflector A. This is not required at an acceptable signal level. To make an antenna with your own hands, you will need tubes made of copper, aluminum, brass or a strip of 0.1-0.15 m.When installing a structure outdoors, aluminum is least suitable for this because of its susceptibility to corrosion. Foil, tin or metal mesh is suitable for the manufacture of capacitive inserts. After installation, they need to make a contour solder.
The cable should be laid without sharp bends and within the side insert.
 Z-antenna for decimeter waves [/ caption] The classic version of the Z-antenna is characterized by operation on 1-5 or 6-12 channels. To make it, you need to stock up:
- wooden slats;
- copper enameled wire 0.6-1.2 mm;
- scraps of fiberglass (foil-clad), dimensions for the corresponding 1-5 / 6-12 channels:
- A = 340/95 cm;
- B, C = 170/45 cm;
- b = 10 / 2.8 cm;
- H = 30/10 cm.
E – this point is characterized by zero potential – the braid must be soldered to the metallized plate for support. Reflector parameters (also for corresponding channels 1-5 / 6-12):
- A = 62 / 17.5 cm;
- B = 30/13 cm;
- D = 320/90 cm.
Another diagram and additional explanations that will help in assembling the antenna are presented below: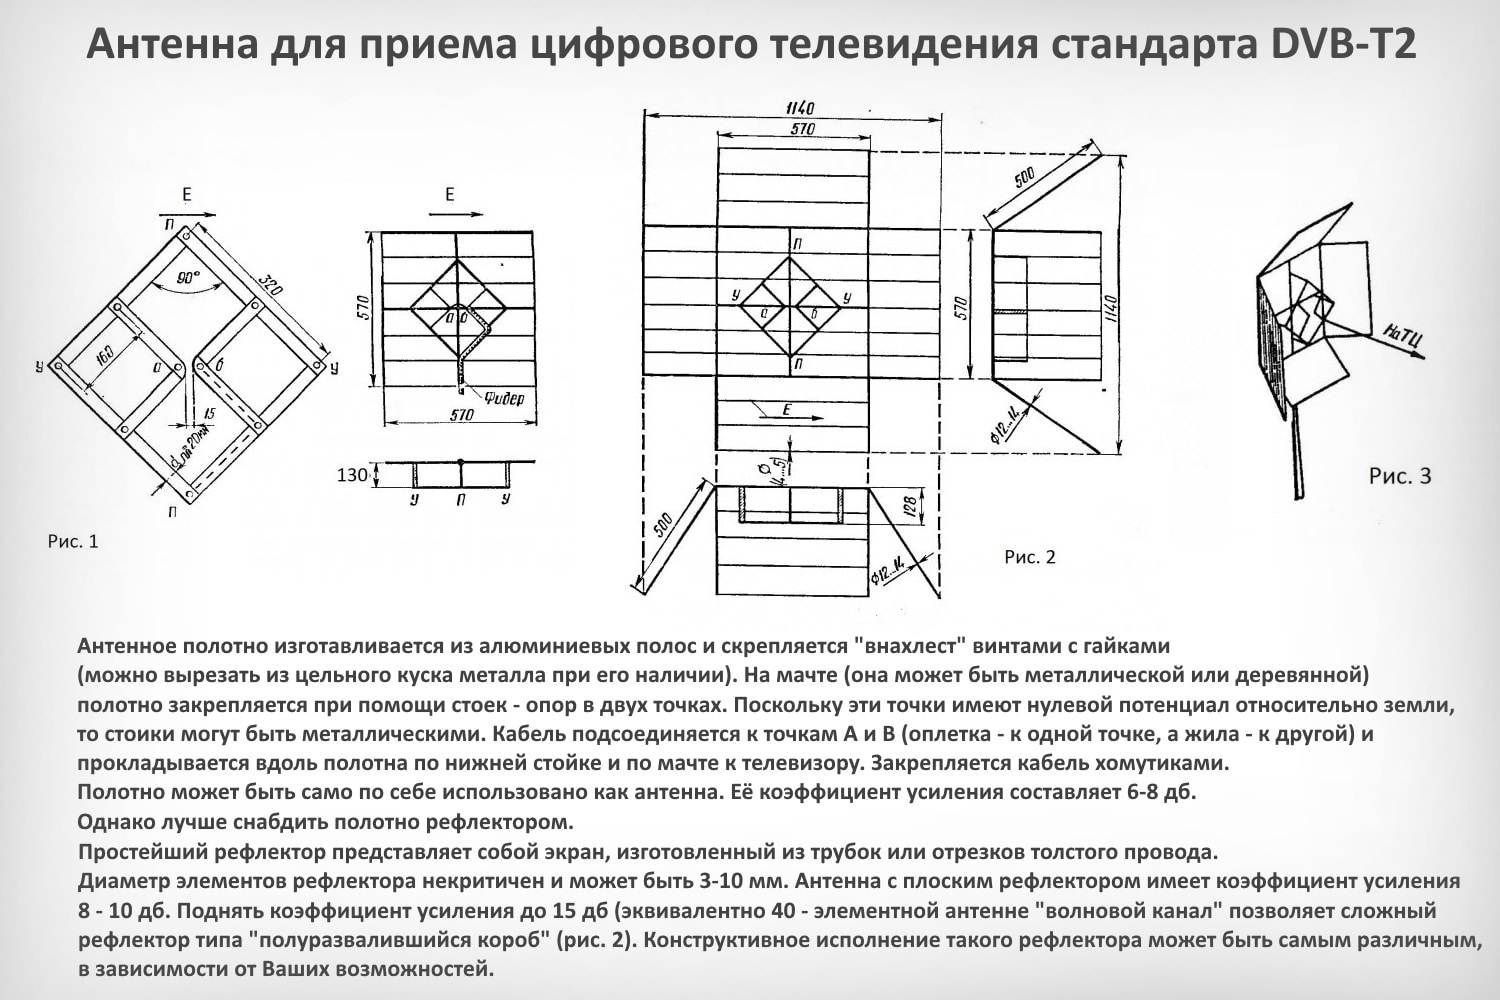
DIY tunable active antenna for digital TV:
https://youtu.be/l1PuJLS7BlM
Antenna-eight
It is considered one of the most commonly used home-made devices for receiving digital TV. It also has another name –
Kharchenko’s antennaor biquadrat. It is a double rhomboid square. This device can be successfully used in various conditions, the only exception is super-dense buildings, since they prevent the reception of reflected signals. When designing the figure eight, it is necessary to make the correct calculations, taking into account the wavelength. All sides of the square and the half-length of the wave section must correspond to each other. As a consequence, the perimeter will be equal to the length of the wave itself. For example, for DTV in the metropolitan area, it will be 0.6 m, respectively, one side – 0.15 m. To make such an antenna, you need to stock up on copper (2-3 mm) or aluminum (5-6 mm) wire. According to the constructive intent, two squares will be required. It is necessary to cut off 2 cm from the wire ends and fasten them to each other so thatso that the result is a monolithic structure – 2 squares and a common angle.
Be sure to isolate the bonded ends of the wire pairs with each other, otherwise the antenna will only emit a signal.
A simple beam is usually used for the frame. If all the actions are performed correctly, the receiver is immediately firmly fixed, since there is no need to check the functionality. The cable is soldered exactly in the middle, at the junction of the wire ends to one of the points. Watch the video on how to make a biquadrat antenna with your own hands: https://www.youtube.com/watch?v=3o0ZBUcL2f0
Three-piece or four-piece wave channel
For the classic type of “wave” three-element antenna, the following components are characteristic:
- director, which has the smallest length and is directed towards the TV tower;
- a rectangular vibrator;
- reflector.
The gain of the device is up to 6 dB. The antenna is capable of picking up the reflected DVB-T2 signal from the TV center approximately 5 km away or in direct vision up to 30 km. Not giving much gain, such a device is not suitable for long-distance reception of the indicated signals. To increase the gain, you need to arm the structure with ten or more elements. It is very difficult to make such an antenna yourself. It is optimal to have three or four elements. The algorithm of actions is as follows:
- You need to stock up on copper wire or a tube from 0.2 to 0.5 cm in diameter. The reflector, director and vibrator are soldered to the guide of the device.
- The structure is mounted on a dielectric pole located next to the cable. The antenna is matched with it with a piece of antenna cable – U-bend, wave resistance 75 Ohm. Its length is multiplied by the shortening factor inherent in the brand of the cable used.
- Antenna vibrator is soldered on both sides with the center conductors of the U-elbow. The latter are connected in the same way to the screens of the outgoing cable, and its central core is connected to the antenna vibrator.
Adding one director will help to increase the gain by a maximum of 2 dB, which at the output will give a four-element antenna and an increase in the stable reception area by several kilometers.
The manufacturing process for a three-piece wave channel antenna is shown in this video: https://www.youtube.com/watch?v=aLY0_7brvbo
Double (triple) square
Self-fabrication of this antenna is similar in terms of calculations with a biquad device. The design feature is the arrangement of several identical squares one after another. The main difference from the eight antenna is the lack of reception of a stable signal from the TV repeater, which is remote at a considerable distance. The purpose of the double (triple) square is to receive signals when the background radiation is high. Often, a television tower in highly compacted buildings, although it is located nearby, there may be other receiving towers of various frequencies that drown out the decimeter wave. This home-made device is able to receive waves of a certain length without any problems, and the multi-level design of the device serves as an amplifier. Squares can be easily mounted on a bar. To mount the device vertically,the tripod (legs) can be a thick conductive element (TE).
Connect the squares to each other not in the active area, but only with the help of outgoing TEs. If this does not work, strip the cable more and solder it to the lower corners of the squares, then attach to the bar.
After completing the assembly of several squares, temporarily fix them and, changing the distance between them, identify the optimal signal reception, and then fix it firmly. How to make an antenna from several biquads to increase the gain is shown in this video: https://youtu.be/6mCVeQgPqvE
Antenna DVB T2 “Butterfly” (“Moth”)
Structurally, such an antenna is characterized by a vertical antenna. In some ways, such devices are similar to factory pin devices for digital TV made in Poland, but differ in that they use a frame instead of a phased array. To make a “butterfly” with your own hands, you need to stock up on:
- drill and self-tapping screws;
- ruler and protractor;
- nippers;
- wire (6 mm) made of aluminum, 3 m long;
- bolts and nuts (16 pcs.) or a soldering iron;
- with a wooden stick.
As a rule, Polish-made antennas for digital TV are designed for outdoor installation, which means that this design will also need to be installed outdoors. To withstand strong winds, it is better to use thicker aluminum instead of copper (3 mm) wire for long antennae.
Digital television programs operate with 21 physical television channels (frequency 314 MHz, wavelength 0.63 m). This correlates with the maximum repeater radiation of the RTRS. The required length of the active area is 0.16 m, for all antennae – 2.56 m. Therefore, a three-meter wire will be sufficient.
The stick is used as a frame, its length must be at least 0.6 m. On the frame, it is necessary to mark for the “antennae”. This is done like this:
- We mark 4 points at an equal (0.2 m) distance.
- We draw lines from the points, they should lie parallel to one another and perpendicular to the frame.
- We measure adjacent angles of 30 degrees (2 to the left and 2 to the right) from straight lines and put points.
- Draw lines at an angle to the designated points from the central ones. These lines will serve as a guide for the installation of the antennae.
Taking into account the half-length of the wave cross-section of 0.15 m, we will analyze two options for the independent manufacture of such an antenna.
Manufacturing using a soldering iron
In this case, much less time will be spent on manufacturing the structure. Metal products are fixed in parallel on a wooden stick. For this, 4 pieces of steel are used (they are subsequently connected) or wire. To see the markings of the TE, the wooden frame must remain open. The locations of the antennae adhesions will serve as the main points on the marking, and the lines drawn at an angle will serve as their location. We take the wire, cut off 16 segments (0.15 m each) with pliers and solder antennae made from them, grouped in 4 pieces, to all the designated points.
It is desirable that all groups of elements be wrapped with insulating tape.
Bolted
This option does not require any metal additions to the wooden structure – accordingly, the device will be lighter. The stick is chosen with the following parameters: width – 4 cm, thickness – from 2 cm. First, the “pits” under the antennae are prepared with a drill. They are made from the side of the stick at an angle deeper along the line on the marking. After that, holes are drilled, passing through the tangential holes. The frame is done. Cut off pieces of 0.17 m from the wire (with a margin), deepen the prepared antennae into the pits by 2 cm, then firmly fix it with nuts and bolts. We wrap the antennae with a thin wire, connect to each other.
Manufacturing an antenna in this way requires more time, but the output is a more durable structure than a soldered one.
How to make a bolt-on butterfly antenna is shown in this video: https://www.youtube.com/watch?v=zGpHdvDyt6s
N. Turkin antenna for digital television reception
The device consists of 6 rings of metal wire, which serve as active vibrators and passive elements and are fixed on a dielectric guide. This antenna has better reception efficiency than the triple square, so it is often installed to receive long-range DVB-T2 signals. N. Turkin’s antenna is a narrowband antenna, therefore, precise settings will be required during its installation. It must be installed in the region where there is only one multiplex (if there are two, then they must be on close channels). If they are spread over a larger number of channels, the reception will be of poor quality. The device consists of the following parts:
- dielectric rod on which installation is carried out;
- directors D1 ÷ D3 with reflector R – passive elements;
- V1, V2 – vibrators;
- ferrite rings (put on the cable near the connection to the vibrators) – a matching device.
The basis for the connection of active vibrators is a Swiss square: a cross-shaped connection of rings with lower cuts from the bottom.
For installation you will need:
- determine the frequency range of DVB-T2;
- make an accurate calculation of the size of the device;
- make details, solder the wiring diagram.
The initial data on the frequency and channel numbers for calculation can be found on the services of DVB-T2 television operators. We will consider digital television broadcasting on channel 40, 626 MHz. Distance (L) between elements – 29, 72, 96, 60, 96 mm (total – 353 mm). Circular lengths – 470, 465, 460, 484, 489, 537 mm.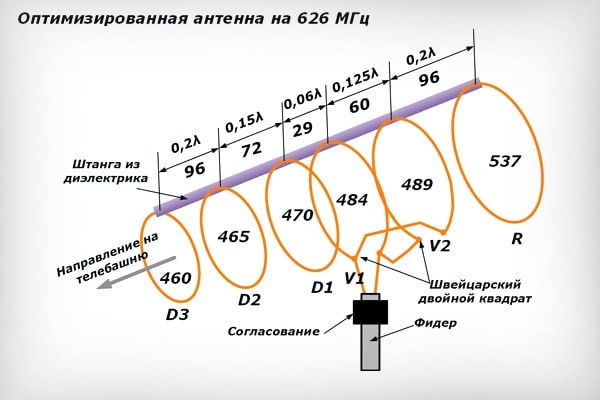 Having decided on the parameters, let’s get to work:
- We select a block of wood (its length should be slightly more than 353 mm) for an insulating rod, copper wire (preferably 2.5 sq. Mm. And 4 m long).
- We mark the holes on which the rings will be attached, and we drill them.
- We manufacture active vibrators and passive elements. We cut the copper core along the circumference of each ring. We bend all segments with rings. For active vibrators, the ends of the rings are made with a gap, so we increase the length of the segments by 8 cm, bend them at a right angle to the side. Solder crosswise to the beginning of the next one.
- We make the cascades of passive elements shorter, subsequently mounting them on a dialectical rod. We solder the ring ends.
- We install directors in the traverse. We pass a jumper made of thin copper, push the vibrator ring on both sides. We wrap the jumper along the tinned place on both sides and solder it.
- We mount vibrators.
- We install the reflector.
- We connect the cable.
- We check the reception quality.
Before you start making an antenna for digital TV, you need to know which format is best for DVB-T2. Having familiarized yourself with several types of homemade antennas, you can choose the option that is most optimal for your case.


Прочитал статью с большим интересом, для россиян очень полезная информация в период всеобщей цифровизации телевидения. Не всегда есть возможность купить хорошую антенну для приема сигнала DVT-T2 формата. Например, антенну-восьмерку делал своими руками и работала на прием лет восемь, пока не купил новый телевизор и антенну. Очень просто собирается и обеспечивает качественное изображение. Если кому-то надо по-быстрому Т-2 антенну – «восьмерка» идеальный вариант. Незатейливый вариант антенны из двух баночек из-под пива тоже, как вариант. Сам не встречал, а сарафанное радио сообщало, что прием цифрового сигнала неплохой.
Я прочитала статью о способах изготовления DVB-T2 антенны для цифрового телевидения и поняла, что существуют разные виды антенн, их можно, как купить,так и изготовить самим. Если кому-то надо по-быстрому Т-2 антенну – «восьмерка» идеальный вариант. Незатейливый вариант антенны из двух баночек из-под пива.Прием цифрового сигнала хороший. Антенна Н. Туркина является узкополосной Ее нужно устанавливать в том регионе, где имеется только один мультиплекс.
Спасибо,молодец! Толково,красиво и без современного слэнга и выпендривания.сделал ант. Харченко, 43-км. от Омска. Смотрю оба мультиплекса.Еще раз -спасибо.