
A detailed review of the World Vision T62A prefix – setup, firmware. World Vision T62A is a receiver that was presented in 2019. Connection via a wireless wi-fi network is supported, which significantly expands the possibilities of using the Internet on the device. The set-top box captures digital television in terrestrial DVB-T/T2 standards and cable DVB-C television.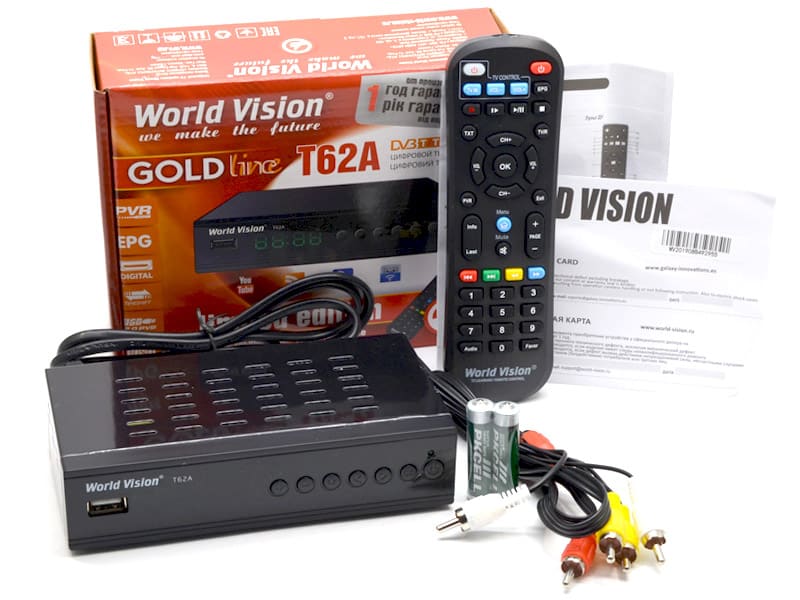
- Specifications World Vision T62A
- Specifications
- Appearance
- What’s on the front
- What’s on the back
- Remote control appearance and functions
- Equipment
- Step-by-step instructions for connecting the World Vision T62A set-top box
- On-air TV setup
- Cable TV setup
- World Vision T62A LAN Interface
- Programs
- Image
- Channel search
- Time
- Languages
- Settings
- media center
- How to install firmware on World Vision T62A
- Checking if there is a need
- Installation process
- Does World Vision T62A need additional cooling?
- Problems and solutions
- There are channels on the TV, but the set-top box does not find them
- Can’t select audio track
- Unable to connect to router
- Pros and cons of the model
Specifications World Vision T62A
Specifications
The receiver runs on a modern Gx3235 processor and supports the AC3 audio codec. The set-top box is equipped with RF IN, RF LOOP, RCA, HDMI, 5V connectors and two USB slots. Word Vision T 62 A works on the well-known and proven MaxLinear MxL608 tuner with good sensitivity and high noise immunity. Supports video playback in resolutions up to 1080p, as well as the vast majority of existing video and audio formats.
- Video formats: MKV, M2TS, TS, AVI, FLV, MP4, MPG.
- Audio formats: MP3, M4A, AAC.
- Image formats: JPEG.
 The set-top box is controlled both by buttons on the device itself and using the remote control.
Appearance
The base and top of the case are made of metal. Additionally, there is perforation at the bottom, top and sides. Due to this solution, the heat has somewhere to go, which greatly reduces the likelihood of overheating. The front panel of the device is plastic. During the first unpacking, the case is covered with a transport film, on top of which a warranty seal is glued. Thanks to this, you can be completely sure that the device has not been opened.
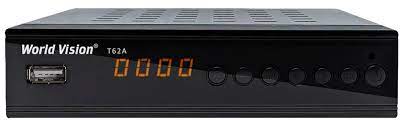
What’s on the front
If we consider the panel from left to right, then first of all we will see the usb port. Nearby you can see the remote control sensor, and a little to the right – a segment indicator. By default, it shows the status of the device (on or off), but using the settings you can make it so that even in standby mode, the exact time is displayed.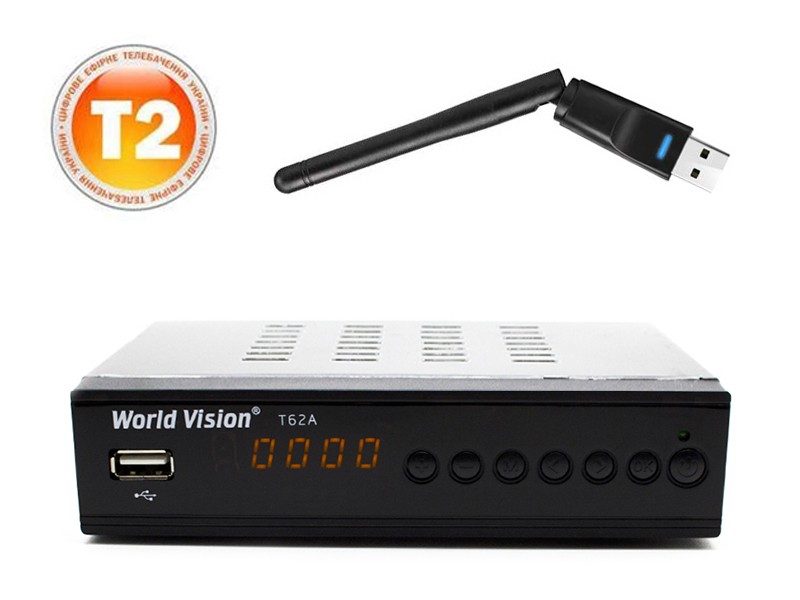 Next is a panel with buttons – this control option is convenient if for some reason it is not possible to use the remote control. Using the buttons, you can adjust the volume, call up the menu, switch channels. There is also an “ok” button and a device power button, directly above which is a green LED. If the receiver is configured correctly, works and receives a signal, the diode will glow.
What’s on the back
On the back panel we see the following connectors:
- Antenna input . It can also serve as an output loop-through connector for connecting to another receiver, or to a TV to catch analog channels.
- Through (or loop) antenna output .
- Additional USB port . The presence of a second such input also becomes one of the advantages of the model – for example, you can use one input to connect a wi-fi adapter, and insert USB drives into the second one.
- HDMI digital audio-video output for connection to modern TVs
- Composite RCA audio and video output . The yellow jack is for video transmission, and the white and red jacks are for the left and right audio channels. In this way, you can connect the device to analog TV.
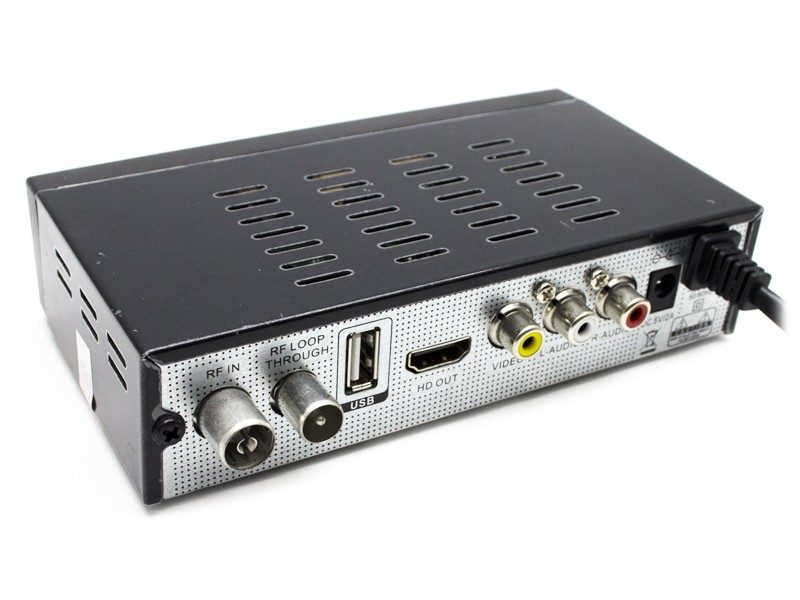
- Connector for mains power . Saves if something happened to the built-in power supply. This feature is rarely found in receivers, although it is very convenient, because it allows you to use the device even if the unit fails unexpectedly.
World Vision T62A – review of DVB-C/T2 receiver: https://youtu.be/eqi9l80n–g
Remote control appearance and functions
The remote control is considered the most convenient in the World Vision T62 line, it has an ergonomic shape and pleasant rubberized buttons that are pressed well. It is noteworthy that there are learning buttons that can be used to control the TV. They are located in a white frame in the upper left corner. So, even without a TV remote control, you can turn it on, switch to AV mode and adjust the volume. Instructions for programming the remote control are attached to it. It is interesting that it is printed on self-adhesive paper, so that it can be glued to any convenient place. But even if it is lost, setting up the device is easy – you need to hold down the “ok” and “0” keys, and then hold the desired button on the television remote control.
Equipment
The kit includes:
- The attachment itself.
- Warranty card.
- Brief instruction manual.
- 3RCA cable for connecting to TV.
- Remote control.
- Batteries for the remote control.
Step-by-step instructions for connecting the World Vision T62A set-top box
The connection process will be slightly different depending on whether you want to set up terrestrial digital television or cable.
On-air TV setup
Step 1. Connect the receiver to the TV and wait for the download to complete. Step 2. The installation guide will appear on the screen – there will be a countdown timer in the lower corner. You don’t need to change anything, just wait 10 seconds for the timer to expire. Step 3. After that, the automatic search for channels will begin. TV channels will be displayed on the left and digital radio stations on the right. The search is quite fast, it can be completed as soon as 20 channels are caught. Step 3.1 (Optional) If necessary, you can enter the frequency manually – in this case, the channel will be found instantly. Step 4. Initial settings are completed – the broadcast of the channel under the first logical number automatically starts.
Cable TV setup
Step 1. Connect the cable and receiver. We are waiting for the end of the download. Step 2. In the installation guide menu, change the value of the item “Search range” to DVB-C. Step 3. Start auto search. Step 4. We are waiting for the capture of all channels and the start of the broadcast. In this case, the channels are out of order, but we can fix this a little later through the menu.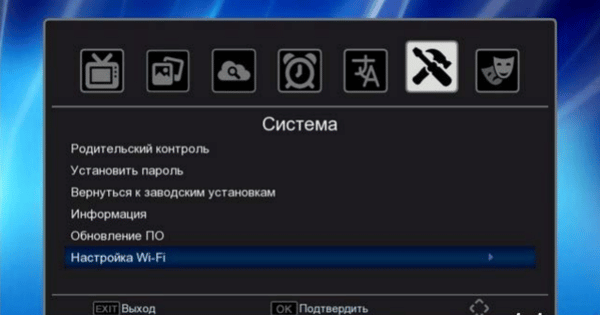
Important. World Vision T62A is not suitable for receiving encrypted cable channels.
World Vision T62A LAN Interface
The menu has been translated into Russian and is quite intuitive. At the top there is the ability to switch between tabs, let’s take a closer look at them.
Programs
This category contains the channel editor, TV guide, and sorting, which is needed to arrange the channels in a logical order. Here you can also select the display mode – for example, make it show the number of the broadcast channel, or local time.
Image
Standard image settings. Interestingly, the display brightness adjustment set in the menu will only be applied when the receiver is in operation.
Channel search
Auto search for channels occurs at the first start, but in this menu category you can manually add TV channels that were not found. You can also turn on the power of the antenna here to connect it directly to the receiver.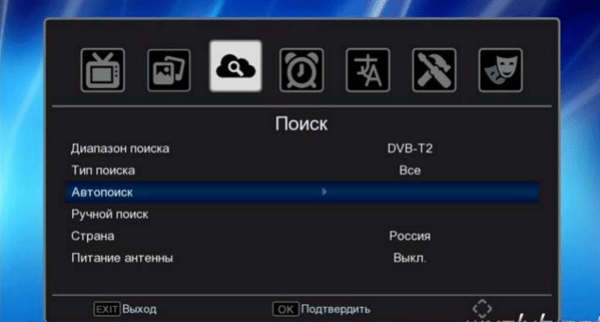
Time
Here are the date and time settings, as well as the sleep timer. There is another interesting feature – the power timer. So you can set the receiver’s operation schedule – when it will automatically turn on and off.
Languages
Allows you to select the language of the menu, TV guide and subtitles.
Settings
Using one of the items, you can, if necessary, reset the device to factory settings. This feature is password protected to prevent accidental data loss. Information about the system is also located here – the time of creating the software is especially important, which, if necessary, can be updated right there.
media center
In the media center, you can view photos, videos and listen to music from a USB drive. It also houses additional networking features from news and weather information to YouTube and internet cinema.
How to install firmware on World Vision T62A
Checking if there is a need
First of all, you need to find out the build date of the installed firmware. To do this, open the menu, go to the settings tab and select the “Information” item. The date is displayed on the screen – if there is a more recent version, then proceed to the installation.
Installation process
First you need to download the new firmware to a USB flash drive. It is posted on the World Vision T62A card on the World Vision website. It is downloaded as an archive that needs to be unpacked onto a pre-formatted media. In the settings of the receiver, click on the line “Software Update”. It is important that the type is set to “Via USB”. We insert the USB flash drive and specify the path to the downloaded file. We start the update. Installation takes only a couple of minutes. After that, the set-top box will automatically reboot. Done, you can check the build date in the information, there will be a new World Vision T62A firmware.
Does World Vision T62A need additional cooling?
Due to the metal case and perforation, the device is not prone to overheating. The problem can only occur with a very bad signal, which will force the receiver to constantly adjust the stream. There is an unofficial accessory for cooling, but it is not recommended to use it. It is better in this case to purchase a better antenna to improve the signal.
Problems and solutions
There are channels on the TV, but the set-top box does not find them
First of all, you should look at the frequencies on which the channels are broadcast and try to enter them manually. If that doesn’t work, check the cable. For further problems, contact the cable company.
Can’t select audio track
To select the desired track, you need to go to the settings and select the “Advanced settings” item. Next, in the second line from the top, you can scroll through all the existing options and select the one you need.
Unable to connect to router
You need to adjust the router settings step by step, each time checking the connection. It is better to save the old set on the computer before this. Also very often a simple firmware update of the router helps.
Pros and cons of the model
Main advantages:
- Learning remote control for TV.
- Good signal reception.
- Simple and convenient setup.
- Combination of external and built-in power supplies.
- Perforated metal case.
Main disadvantages:
- Poor quality of the wire that comes with the kit.
- No option to automatically skip coded programs during setup.
- Susceptibility to power surges.


Ютуб не берет,просмотренные видео почти не удаляет,так кое какие,много форматов не читает,для ТВ годится а остальное не чего не берет,отличная приставка, world vision t64d все брала и Ютуб и мегого фильмы всё читала,и все удаляла.