
When preparing for a mass event or a conference, as well as when watching a movie at home in a large family, it often becomes necessary to broadcast an image from a laptop using a projector to a large group of people. The easiest way is to broadcast a picture through a projector to a portable or stationary screen, for this you need to know how to connect
the projector to a laptop. This can be done in two ways: using a wired or wireless connection. Before connecting, you need to carefully study the surface of the projector, especially its rear interface panel, which contains all the available connectors, as well as all the available connectors on the laptop. Some of them will have the same configuration.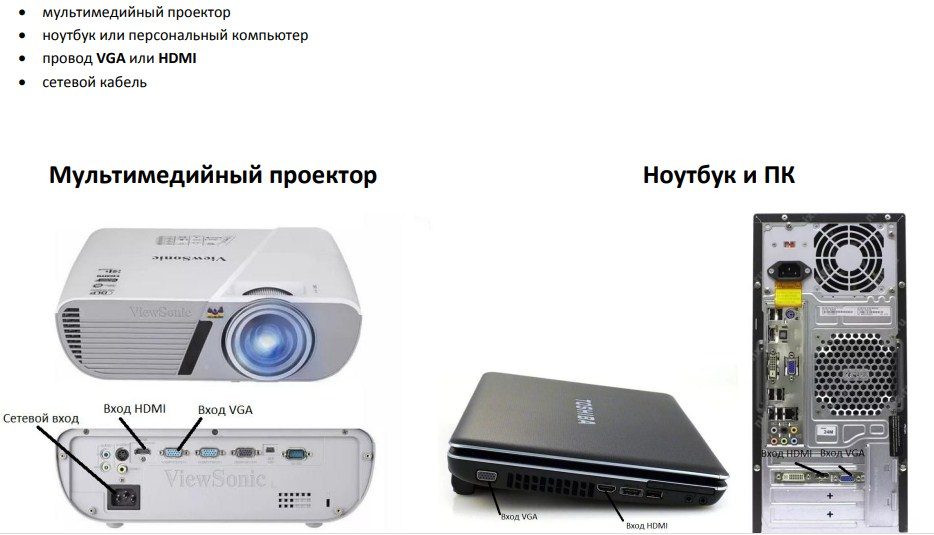
- Types of connectors for connecting a video projector
- Wireless connection
- Connecting a laptop to a projector – step by step instructions
- Screen behavior customization
- Adjusting how sound works
- Possible problems and solutions
- Resolution does not match
- Screens mixed up
- No sound
- Connecting an interactive speaker
Types of connectors for connecting a video projector
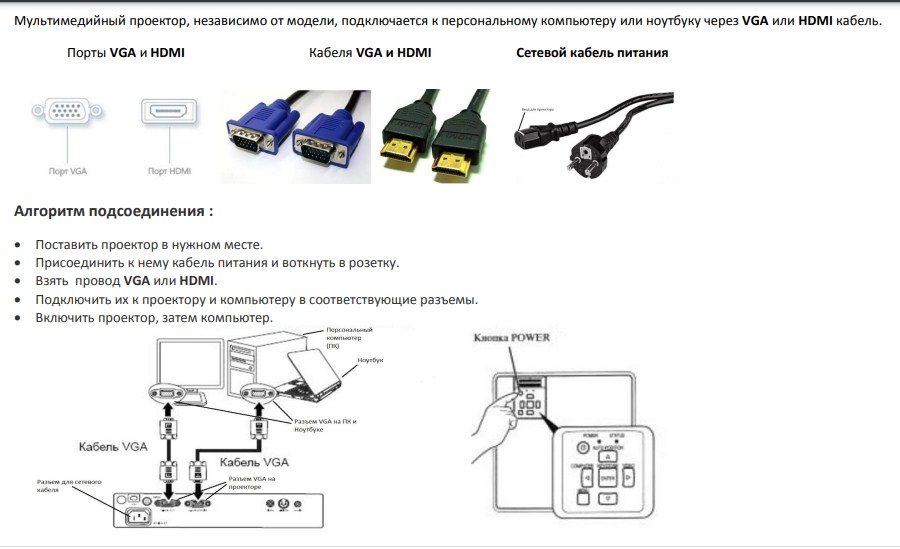
There are two types of connectors that are used to transmit a video signal from a laptop or computer to a projector: VGA and HDMI. In new projectors, ports can be duplicated; for a permanently fixed projector, several broadcasting devices can be connected simultaneously. The VGA port can only be used for video signal transmission, the connector has the following configuration:![]() The laptop must also have this port.
The laptop must also have this port.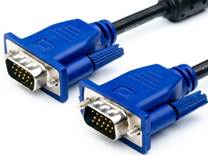 To connect to such a port, a VGA cable is used, both ends of which are the same and fit the connector. To prevent the cable from being disconnected while the projector is in operation, it must be screwed on. The cable is not screwed to the laptop, there are no necessary fasteners for this, so it is important to ensure that the cable does not disconnect from the laptop. If you plan to play video with sound, you need to think extra about amplifying the sound volume, you will need to connect an audio amplifying device to the headphone jack. The HDMI cable connects to a port of this configuration, which can be found on both the laptop and the projector’s interface panel:
![]() To connect the projector to a laptop through this port, an HDMI cable is used, both ends of which are the same and fit the connector.
To connect the projector to a laptop through this port, an HDMI cable is used, both ends of which are the same and fit the connector.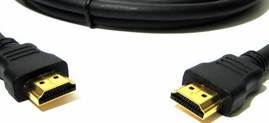 This cable transmits not only the image, but also the sound signal. The sound in this case will be played through the built-in speaker on the projector.
 The power of this speaker, as a rule, is very small, 5-10 dB, it may not be enough to sound even a small room, and you will need to take care of additional sound amplification. The amplifier in this case can be connected to the output on the panel of the projector or to the headphone output on a laptop. On the projector, the sound output for amplification is signed Audio Out, the connector can have a different configuration, it is best to find out all the features of the connection before the event.
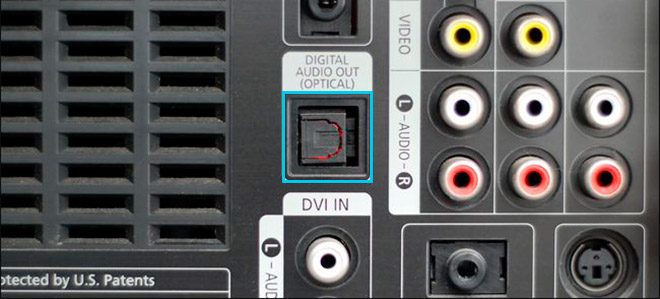 The easiest to set up will be a wired connection, but it will require the purchase of a cable of sufficient length with connectors available both on the projector and on the laptop, and in case of mismatch of the connectors, an additional adapter (adapter from the projector to the laptop) that will allow you to connect the cable into the system. The adapter may or may not have a cable insert; the configuration of the part does not affect the quality of work.
Wireless connection
A wireless connection can be created using an optional Wi-Fi signal module, which is purchased separately and connected via a USB port. This feature is available on modern new generation projectors. After connecting the module, the settings are configured from the computer to allow the projector to receive images and videos via the home wireless network and broadcast them. If the projector supports a wireless connection and the router settings allow it to be connected, then it will be possible to broadcast on it even from a phone. In the operation of the projector with a wireless connection, the presence of special software and the accuracy of network settings are of great importance, which are best left to a specialist.
Connecting a laptop to a projector – step by step instructions
Walkthrough:
- Before connecting a laptop to the projector, disconnect all equipment from the mains and arrange it in the required positions. The distance from the laptop to the projector should not physically exceed the length of the video cable. At the same time, devices can be connected to the network in different places.
- Position the video cable into the required connector by sliding it slightly. The cable should go into the socket by 7-8 mm. The HDMI cable does not need to be additionally fixed, but the VGA cable needs to be screwed to the projector.
- Connect the devices to the network and turn them on.
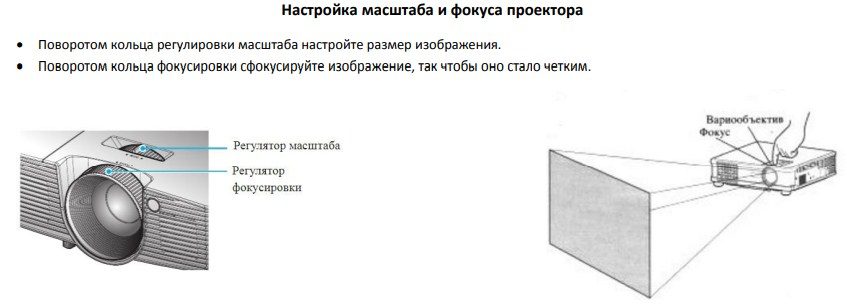
- The video signal on a working laptop is immediately fed to the video ports, so when you turn on the computer, a projection of the welcome screen will appear. At this stage, you can adjust the sharpness of the projector. This can be done by turning wheels or shaders on or near the lens. One of the wheels changes the size of the projected image, the other adjusts the sharpness.
- Installing additional drivers for a laptop to prepare the projector for work with a wired connection is not required.
Screen behavior customization
The image from the laptop screen is usually completely duplicated on the projector and displayed on the big screen. But this mode is not always convenient, and you will have to slightly change the settings on your laptop so as not to show desktop icons to viewers, switching between presentations, and other non-ceremonial moments. To change the screen settings, right-click on any free space on the laptop desktop. Depending on the operating system, you will see a window:
For Windows 7 and 8 , select the “Screen Resolution” item.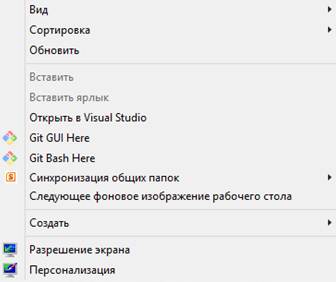 The system will automatically find all connected devices, including the projector. Under number 1 there will be a laptop screen, the projector will be under the second number, in the “Display” tab the name of the equipment will be displayed. In the “Multiple Screens” tab, the available choice of actions will be offered:
- Computer screen only – no image will be output to the projector.
- Duplicate Screen Only – The laptop screen will be turned off during the broadcast, and the image will be displayed only on the projector. In this case, the mouse, keyboard, touchpad on the laptop will work without changes.
- Duplicate screens – an exact copy of the laptop screen is displayed on the projector, during the broadcast all user actions will be visible.
 Expand screen – the laptop screen is complemented on the right by another screen on which the image will be fed. When showing a presentation on a large screen, a broadcast will go on, and on a laptop screen, you can organize a slide preview, leave desktop icons, because they will not be visible during the broadcast. This mode is most convenient if all elements of the presentation will be launched through one program, for example, Power Point or a video player. If you frequently switch between different programs, this mode may seem impractical, as it may require the installation of additional software or advanced computer skills.
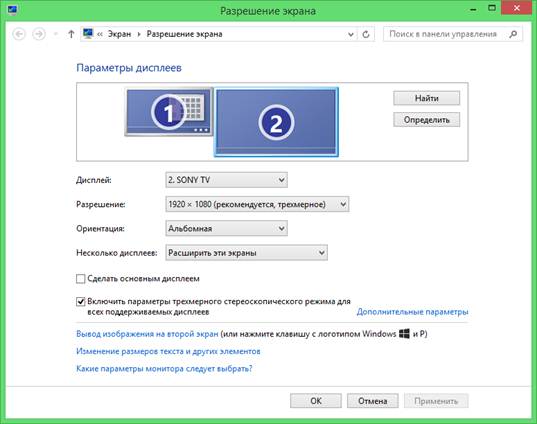
For Windows 10 , right-click on the desktop and select the Display Settings tab. When the second screen is found, use the scroll bar to select the video broadcast options.
Adjusting how sound works
If the video broadcast will be conducted via an HDMI cable, and the sound will be output to amplifying equipment, you need to redirect the sound from HDMI to the audio output. To do this, right-click on the volume icon in the lower right corner of the screen and select the “Playback devices” tab.
 In the list that appears, you need to disable the Audio HDMI Out device. To do this, right-click on the device icon and select “disable”. The choice between the headphone output and external speakers will be made automatically by the system.
After the equipment is connected, do not forget to run the presentation broadcast in test mode before the event and make sure everything works correctly.
How to connect a monitor or projector to a laptop: https://youtu.be/OF7zhrG2EUs
Possible problems and solutions
Resolution does not match
If during the broadcast the image does not occupy the entire screen, but leaves a wide black frame around the edges, then the maximum resolution of the projector does not match the resolution of the laptop screen. You will have to return to the step where the extended screen was configured, and in the display resolution column, change the value up or down, while paying attention to the interactive operation of the projector.
Screens mixed up
If, when the screen is extended, all desktop icons are broadcast to the large screen and disappear from the laptop screen, you have incorrectly set the priority of screens, and you are using a projector instead of a monitor. You need to return to the step of setting up the extended screen, using the image from the projector, where all the stages of work are visible, and clicking on the screens with numbers and drop-down boxes with menus to make the laptop screen a priority.
No sound
If everything is connected correctly, but there is no sound, then the problem may be that the amplifying equipment is not yet connected, and the sound will appear after the equipment is fully connected. To make sure that the sound on the video is there and working, unplug the audio cable from the socket, the sound should automatically work on the laptop’s built-in speakers. If this does not happen, the problem may be in the video itself or the player. Play the video with another player.
Connecting an interactive speaker
If an interactive speaker with a Bluetooth connection is used to play sound, then it will be synchronized with a laptop when setting the sound to the built-in speakers. There is a search button on the speaker for available Bluetooth devices, and on a laptop there is a settings icon in the lower right corner. Right click on the Bluetooth icon and pair. Sound output will start automatically, and you can adjust its volume using the buttons on the laptop.


