
“How to make karaoke on a home TV?” This question is often asked by viewers who love to sing. If your TV has a built-in karaoke application or just Internet access, then just turn it on (in the second case, download it first). If not, you can use your computer to download karaoke to a flash drive and connect it to your TV.
- What do you need for karaoke at home on TV?
- Selecting and connecting a microphone
- How to download karaoke for free on a flash drive?
- Copying from a disc
- Ripping digital songs from PC
- How to sing karaoke on a flash drive from a TV?
- Other ways to enjoy karaoke
- Via computer
- Smart TV or set-top box
- Via DVD
- Via smartphone
- Possible problems when connecting, and how to solve them
- Flash drive issues
- Wrong entry or format
- Damage to the USB connector of the TV or flash drive
- Too much flash memory
What do you need for karaoke at home on TV?
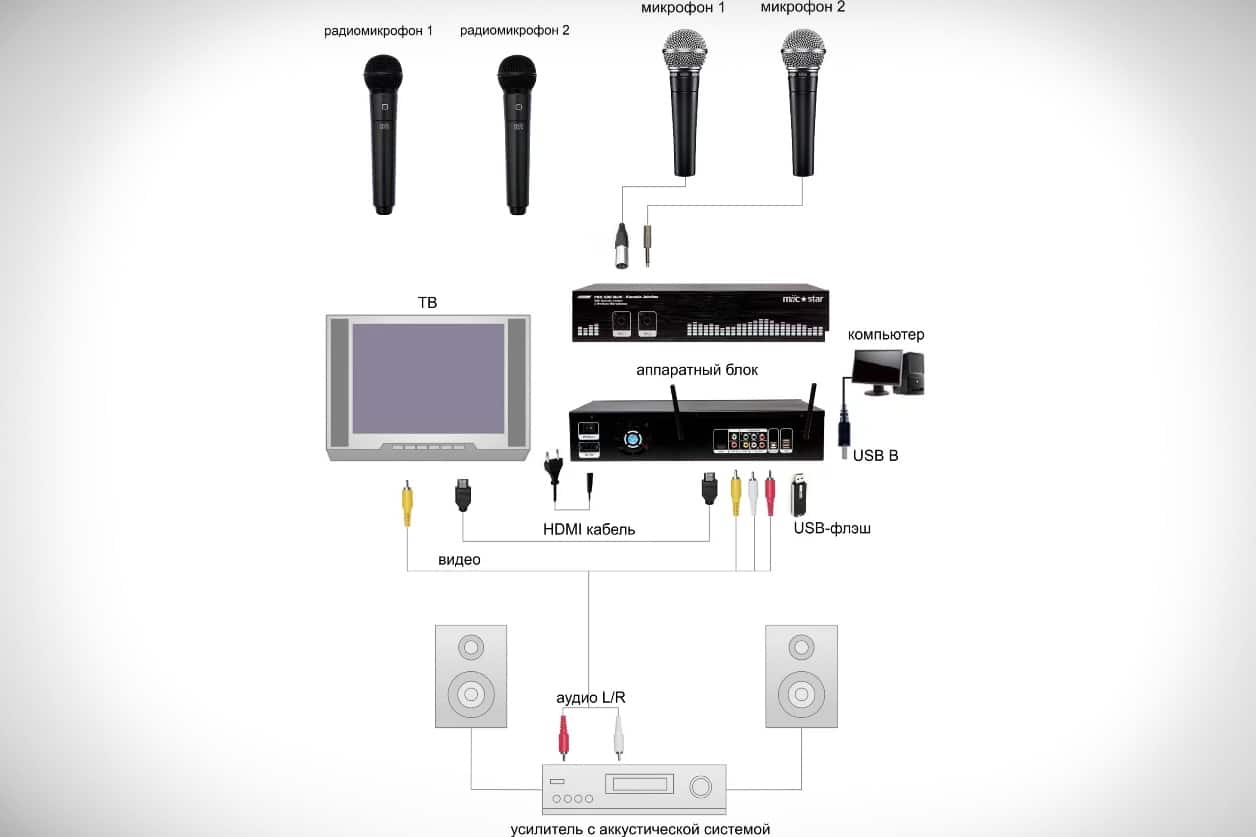
For a full-fledged procedure for playing karaoke through a TV, additional equipment is required. It includes:
- Player. It is a DVD player with a microphone connector. The connection is made via HDMI, SCART and RCA (tulip).
- Microphone. Required to transmit voice to equipment.
- vocal system. Additional equipment for a microphone through which a voice signal is reproduced.
To improve the sound quality and bring it closer to the ideal, it is recommended to purchase:
- Stereo speakers. They reproduce surround sound, but are suitable for a room with a large area.
- Mixer. Allows you to fine-tune the sound of each melody, taking into account the style.
To avoid mistakes when purchasing a karaoke, before buying, you need to inspect the TV receiver for the presence of the necessary plugs for equipment compatibility. You will also need a dedicated karaoke app for your smart TV. Some TV models already include this software, and if not, you can download it from the TV’s app store. If the TV does not have Internet access, you can:
- Download the application to your computer.
- Then transfer it from the USB drive to the TV.
Selecting and connecting a microphone
The process for connecting a microphone differs depending on which device was purchased – with or without a wire. Each species has its own characteristics:
- Wired. TVs to be connected must be equipped with 6.3 or 3.5 mm plug connectors. The second size is often used, it is indicated by the inscription “Audio In” or an image in the form of a microphone. You can also use the USB cable connection.
- Wireless. The connection is made via Bluetooth or radio transmission, in the first case you need to go to the TV settings and activate the connection channel, the second option is to connect the audio receiver that comes with the microphone.
If the wireless device does not connect, it can be connected using the wire supplied.
How to download karaoke for free on a flash drive?
There are two ways to get karaoke on a flash drive. The first is using a karaoke disc. This method can be called free only if you have one lying around at your home or with your friends. Of course, it doesn’t make sense to buy a disc on purpose. The second is to download files from the Internet.
Copying from a disc
If you have a disk with karaoke, there is no prohibition against copying on it, and you have a laptop with disk drives or a computer, then you can transfer data to a USB flash drive from it. For this:
- Insert a disc into the drive.
- Open the contents of the media.
- Insert flash drive.
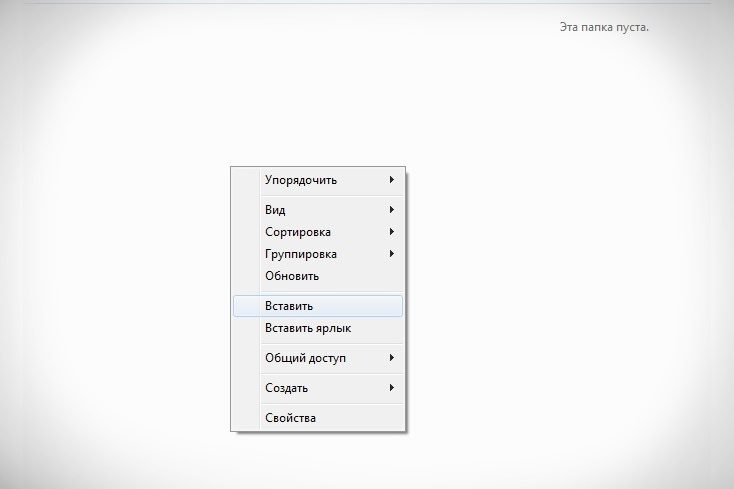
- Copy the files from the disk to the flash drive – select all the contents on the first one, right-click, click “Copy”.
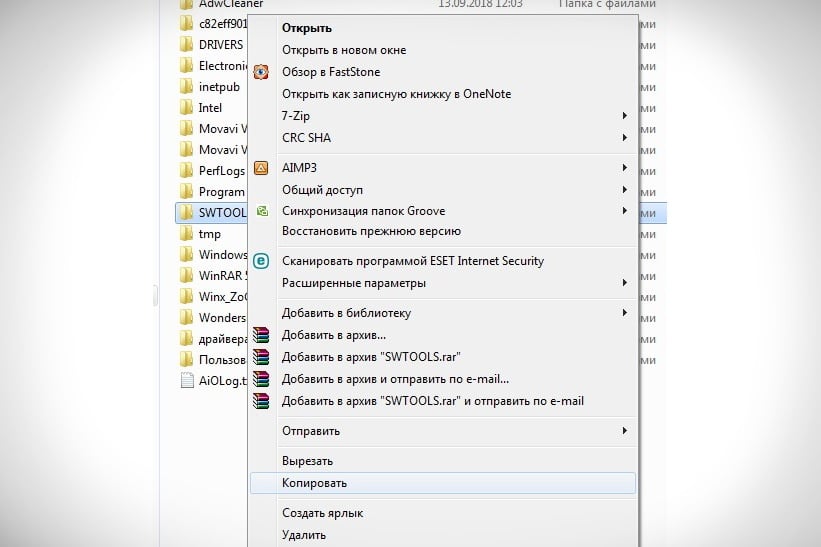
- Transfer the data to the flash drive – open it, right-click in any free space and click “Paste”.


Information from the karaoke disc is transferred to a flash memory card. In the future, you can transfer files to any type of media.
If the disk is protected from data copying, then when you select the necessary files for transfer and call the menu with the right mouse button, the “Copy” option will simply not be there.
Ripping digital songs from PC
To copy songs from a PC to a flash drive, you first need to download them to your computer from Internet sites. To do this, enter in the browser “download karaoke for Smart TV” or use one of our direct links:
- KaraokeBase. Download – https://soft.sibnet.ru/get/?id=20857. The collection contains more than 20,000 songs from different countries, including the latest hits from famous artists. The file provides storage, navigation, search, launch, etc. You do not need to look for additional SOFTWARE for playing.
- Karaoke.Ru. Download – https://play.google.com/store/apps/details?id=ru.karaoke.app&hl=ru&gl=US. Easy to use but paid application. Regularly updated and convenient catalog of songs, subdivided into categories. All content is licensed. A weekly subscription costs 199 ₽.
- Smart Karaoke TV. Download – https://m.apkpure.com/en/smart-karaoke-tv/com.smartkaraoke.tvapp/download?from=details. This is a smart karaoke app with a rich selection of songs from different genres. There is a search for songs, pause / resume audio track, volume control.
After downloading, insert the flash drive into the USB port of the computer, and copy the contents of the downloaded archive to the drive (without unpacking).
How to sing karaoke on a flash drive from a TV?
Before downloading karaoke to a USB flash drive, you should check for the presence of pre-installed software from the TV manufacturer. Many brands install their own software that is compatible with devices. If it is, it is enough to download only the catalog of songs. What to do after downloading karaoke to a USB flash drive:
- Insert the drive into the TV’s USB port (preferably in the top slot).
- For some Smart TV models, the download starts automatically (for example, Samsung), but if this does not happen, turn on the “My Apps” application (it may be called differently, it all depends on the TV brand), and select the USB icon.
- Open the file from the flash drive.

The program will then download and open. To start singing, make sure that everything you need is connected (for example, a microphone) and select a song from the catalog.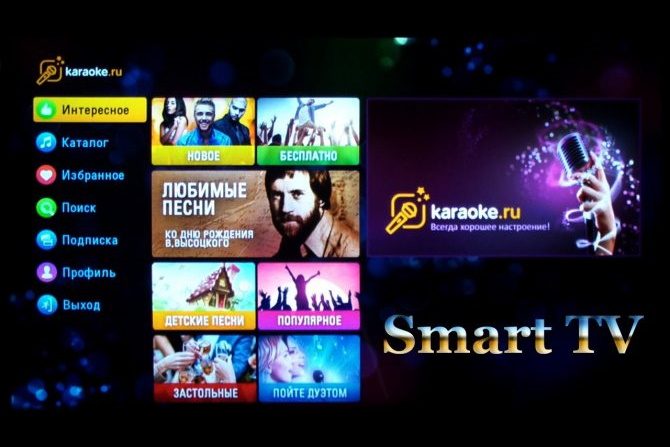
Other ways to enjoy karaoke
To connect karaoke to a home TV, several more options are used. A detailed overview of each of them is below.
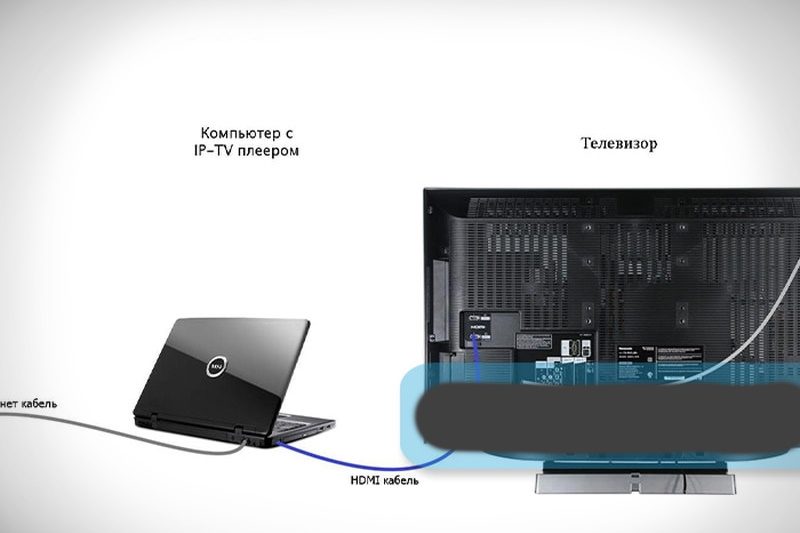
Via computer
To connect via a computer (or laptop), connect the karaoke microphone to the TV. The TV receiver here can only be used as a screen for reading text.
When connected with an HDMI cable, the sound is transmitted through the additional speakers or TV speakers. If the sound is quiet, buy a microphone amplifier.
What to do:
- Install any karaoke application on your PC or laptop (many utilities are available for free on the Internet).
- Right-click anywhere on the desktop to open settings. This will display the image on the main screen.
- Choose one of the display methods offered by the system.
This method is the only one if you want to sing karaoke from an old model TV.
Smart TV or set-top box
Most often, to sing karaoke at home, you will need a prefix. Manufacturers offer two types of equipment:
- special;
- multifunctional.
The last option must be chosen carefully so that the device supports karaoke. Such models give you access to the Internet and other additional services. services — for example, the ability to connect a computer mouse, keyboard, gamepad, set up control from a smartphone, etc. What should be done to implement:
- Connect the cable from the set-top box to the TV.
- Open your TV settings.
- Select source – HDMI, SCART or RCA.
- Insert the microphone plug into the TV socket, then turn on the tuner.
To connect karaoke to Samsung with Smart TV, more complex manipulations are required – you need to determine which microphone with which connector you need. To do this, check the back or sides of the TV. If there are no holes for the correct connection (3.5 or 6.3 mm), the following must be done:
- Use a USB connection.
- Then download the necessary software to your TV.
- To search, connect to the Internet on your TV and search in your browser.
Via DVD
Connecting karaoke via DVD is the easiest way. These days, few people have such players left, because other devices have replaced them, and music and movie discs are fading away. But if you have not thrown away this miracle device, you can use it to connect karaoke. What should be done:
- Connect the TV to the DVD player with a cable (the usual one is a tulip, HDMI or SCART).
- Connect the microphone to the player.
- Use the remote control to select the source “DVD”.
- Turn on the player and insert a karaoke disc or USB flash drive with files.
Consider ports when choosing a cable. The Blu-ray configuration is similar.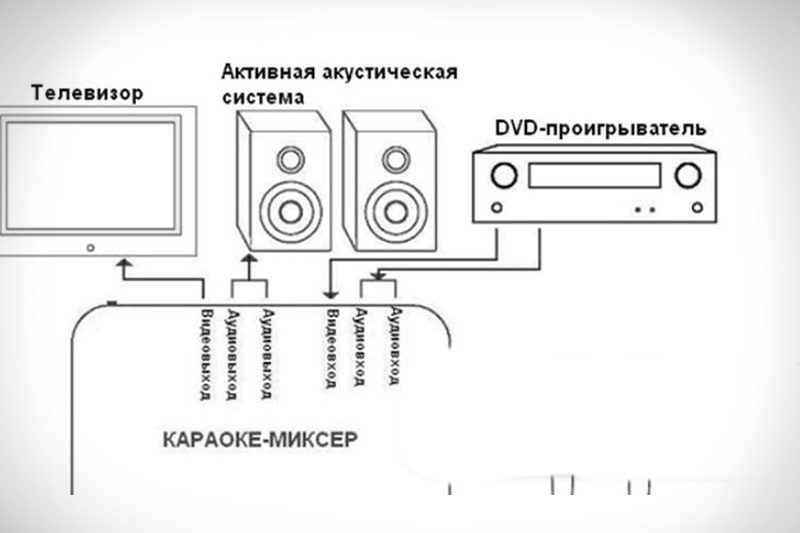
Via smartphone
Owners of mobile devices with Android and iOS operating systems just need to follow a few steps to install karaoke on their TV. They are the following:
- Download a special program on your phone. The top five most popular included “Smule”, “Mobile Karaoke Quail”, “Karaoke in Russian”, “StarMaker” and “Karaoke Anywhere”.
- Connect your device to your TV with a USB/HDMI cable.
- Turn on the TV, and select the “Use as mass storage (as USB)” function on the phone screen.

- Press the Source button on the TV control panel or select USB as the source.
- Connect the microphone to your smartphone using a special adapter or USB adapter.
- Check the performance of the created system. To do this, turn on the voice recorder on your phone and record your voice. When listening to recorded audio, if all sounds are clearly audible and there is no interference, the microphone is properly connected to the device.
- If everything is in order, launch the application on your mobile device and enjoy karaoke.

When connected correctly, the device monitor will ask for permission to connect a headset or an icon about an external device.
Possible problems when connecting, and how to solve them
There are the most common problems when connecting a karaoke to a TV via a USB flash drive. The list is this:
- devices do not connect, do not “see” each other;
- the TV does not recognize the flash drive and other connected devices;
- no sound appears.
Use these troubleshooting tips:
- check the integrity of all cables and their correct physical connection;
- reboot all devices;
- replace the battery in the microphone;
- update the software – there is a special section in the Smart TV settings; for simple TVs, the downloaded software is preloaded on USB and installed on the TV from a USB flash drive;
- check device compatibility;
- shorten the distance when using a wireless microphone (you may be standing too far from the TV receiver and the signal does not reach).
Flash drive issues
If the flash drive is not working properly, the dysfunction may be caused by a virus. Infection is possible when copying songs from a personal computer. This is real if you don’t have antivirus software installed on your PC. Playback of files on such media becomes impossible. Other reasons may be related to:
- file playback;
- removable device or recorder malfunction;
- incompatibility of devices (TV and flash drives).
Wrong entry or format
If cumulative refuses to work on the TV, but used to function perfectly, it may be due to a bug in the file. Or in the wrong flash drive format. What is the fault and what to do in such cases:
- A different file system has been selected. You can change it on your PC. To do this, click on the “My Computer” icon. Select “Properties” from the menu. In the window that appears, find the “File system” item. Select the desired option (NTFS or FAT32) from the list.
- File names contain Cyrillic letters. The solution here is much simpler – you need to change the name, and remove the unnecessary from it. This can be done on a computer and then copy the files to a USB flash drive with a new name.
Damage to the USB connector of the TV or flash drive
There are a number of factors that can cause this problem to occur. They are the following:
- mechanical causes: strong impact, for example, when falling;
- high humidity in the room;
- uneven pulling of the flash drive from the connector (with loose movements);
- exposure to sufficiently strong electromagnetic fields;
- prolonged or very frequent operation of the device.
If any of these factors are present, the external drive will not open and the files will not be copied. It also becomes impossible to write information to a medium with such defects. In most cases, the damage cannot be repaired.
Too much flash memory
If the settings of the external drive and the TV do not match, the media is not accepted by the player. It is impossible to open and copy the data stored on it. The solution to this problem is to change the capacity of the flash drive by dividing the flash memory into sections, each of which is set by an arbitrary parameter. How to partition the memory of a flash drive is shown in the video:
To avoid such problems, it is recommended to compare its parameters with the characteristics of the TV before buying a flash drive.
Home karaoke has become popular for a long time, and today it remains relevant. Equipment and programs for installing it on TV are as accessible as possible. To implement the idea of karaoke on a home TV, you do not need special technical skills or a lot of money. It is enough to study the process and strictly follow it.


