
Using a satellite dish makes it possible to watch many interesting programs. In order to provide a good signal, fine tuning is needed. An error of even a few degrees can lead to its loss. In order to carry out such a setting, special programs are used. SatFinder is one of the best quality applications used for this purpose. SatFinder program interface [/ caption]
What kind of application is it, why is it needed
You can adjust the satellite dish yourself. To do this, you need to know how to do it and have all the necessary information about the satellite that is transmitting the signal. Knowing the exact direction, the user gets the opportunity to properly adjust the antenna. SatFinder allows you to:
- It contains a list of all available satellites with basic data about them.
- Having chosen the appropriate one, you can find out the exact azimuth and determine their height, the required inclination of the converter.
- For each satellite, you can get a list of available channels.
- Satellite data can not only be presented in digital form, but also reflected on maps
- If your smartphone has a built-in compass, it will help you directly determine the direction.
- The principle of augmented reality is used here. Looking through the video camera, you can see the direction to the selected satellite.
 The user can tune in to the free channels of any of the available broadcasting satellites. Usually he enters into a contract with a provider and gets access to paid channels. After depositing money, he gets access to view them. In the latter case, he knows exactly from which satellite the broadcast is being made. SatFinder users can take advantage of the following benefits:
- The program is distributed free of charge.
- Provides high accuracy in determining the azimuth and inclination of the direction to the satellite.
- At any time during work, you can take a screenshot of the received data.
- Simplicity and thoughtfulness of the interface. Even a new user can easily learn to work with this application.
- Low consumption of system resources.
- High speed of work.
SatFinder is one of the most popular offers for determining the coordinates of TV broadcast satellites.
Where to download and how to download
The SatFinder application can be downloaded and installed on an Android smartphone. It is available at
https://play.google.com/store/apps/details?id=com.esys.satfinder . To do this, open the specified address from your smartphone and click on the “Install” button on the page. After that, the application will be downloaded and installed in automatic mode. If for some reason Google Play is not available at this moment, you can use a search engine, for example, Yandex, to search for the program. For example, if you enter the text “SatFinder for Android Smartphone”, you can find pages from which you can download the application in the search results.
Device Requirements
The program will work provided that the smartphone has Android 4.1 or higher. In the process, you need to be able to use GPS. A built-in compass may be required to determine the direction to a satellite. The program will not work without it. To work, you need to have a video camera in your phone. Without meeting these conditions, you will not be able to use the program.
How to use the satellite finder on your phone to set up satellite dishes
Before starting work, you need to make settings. The following points will need to be adjusted:
- Audio Alert – allows you to enable or disable the audio signal when determining the correct direction to the satellite.
- The search for the desired direction will be carried out with a certain accuracy. It can be set in this setting item. If it is too high, it will take considerable effort to determine the exact direction. If not, it will affect the quality of the received signal.
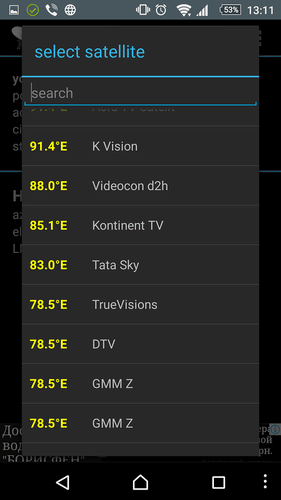
- In the Satellite List section, a list of those satellites will be presented with which work will be carried out. This application works with almost all broadcast satellites in the world. It should be borne in mind that only a part of them is needed. Here you can make a short list of satellites that will be displayed in the program. If necessary, it can be supplemented or shortened.
 Satellite List [/ caption] At the first start the program will ask for permission to use GPS. If you do not do this, SatFinder will not be able to perform its functions.
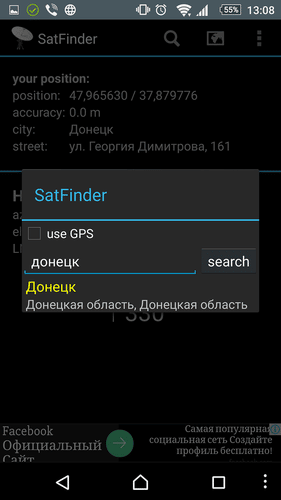 SatFinder requests permission to use GPS [/ caption] To use the program to search for satellites of the satellite finder, you need to do the following:
- It is necessary to turn on the Internet and It should be borne in mind that being inside buildings it is not always possible to get access to GPS. It is advisable to make the setting on the street or near a window. In some cases, determining the user’s location can be slow. If this happens, you need to wait until it is done.
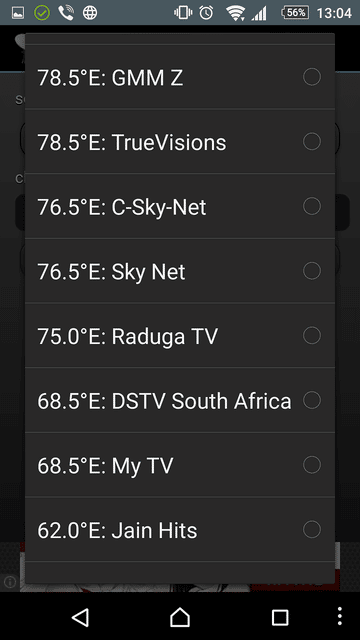
- The next step is to specify the desired satellite. This requires getting the names of those that are above the horizon. To do this, you need to click on the magnifying glass icon. In the proposed list, you will need to select the desired satellite.
 List of satellites in the satellite finder [/ caption]
 - Then the necessary calculations are carried out and the user is provided with the azimuth, height and inclination of the direction to the satellite. When determining the azimuth, the magnetic inclination is taken into account. In this case, the green line will be directed to the satellite, and the red line will show the direction of the smartphone at that moment. The user must reposition the phone so that the two lines match.
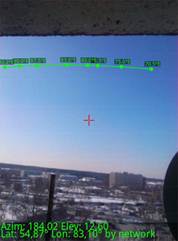
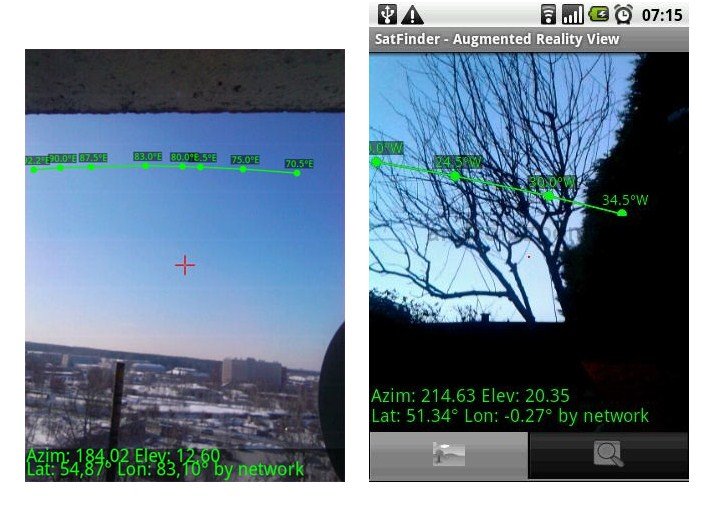
 Azimuth, altitude and tilt angle of the direction to the satellite [/ caption] To get the exact value, you need to first calibrate the built-in compass. To do this, after switching on, you need to rotate the gadget several times relative to all three axes. Next to the magnifying glass is an icon with a book symbol. Clicking on it will open a Google map showing the user’s location. There are two search methods that can be used during setup: arc display and precise positioning. In the first case, viewing through a video camera is performed. The image displays the following data:
- A visual arc (also called Clark’s belt), on which all available satellites are located in various places.
 Clark’s belt [/ caption]
 - There is an accurate mark of the direction to the selected satellite.
- At the bottom of the screen, you can see the exact data characterizing the direction to the satellite in digital form. They occupy two lines.
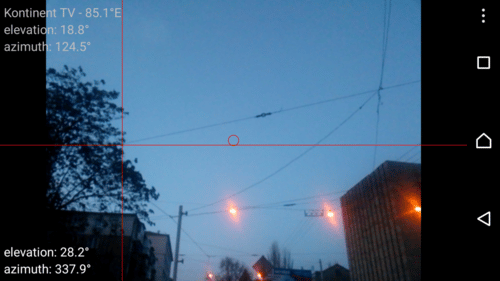
This method allows you to visually determine the direction to the broadcast satellite. It can be seen if there are any obstacles to signal reception. If necessary, you can take a screenshot to capture the information shown here. You can use Precision Detection to determine the direction. In this case, the screen shows an image that resembles a sight. In the center, the elevation angle of the satellite and the azimuth of the direction to it are indicated. Yellow arrows may be shown on four sides. They appear when you need to correct the position of the phone in the appropriate direction.
 Once the correct direction is established, the arrows will turn green, point to the center of the screen, and a beep will sound.
Review of Android application Sat finder for setting up satellite TV:
https://youtu.be/o8brGu4RSdo
How to set up satellite TV using the SatFinder device
In order to start the installation procedure, you can use a specialized measuring device. The built-in capabilities of the TV or tuner may not be sufficient to carry out this work. Such a device is called SatFinder. Its name reflects its purpose – searching for a satellite, determining the optimal parameters for signal reception.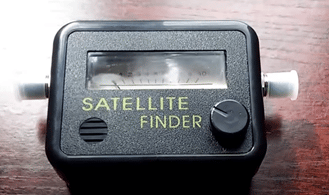 SatFinder device [/ caption] This device has two connectors. One of them is designed to connect a satellite dish (marked TO LNB), to the other (TO REC) connect the cable from the tuner. When the device is not in use, there are plugs on the connectors. There is an adjustment knob that can be rotated left or right. The scale has numbers from 0 to 10. There is an arrow here, which, when fine tuned, should show as large a number as possible. In order to perform the tuning, you need to connect an antenna and a tuner to the device. Tuning consists in changing the direction of the antenna in search of the optimal position. When a signal appears, the instrument starts beeping. The louder the device beeps, the more accurate the setting is.
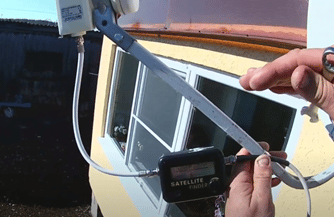 Further, the control knob can be used to improve the signal. By twisting it, you can make a more accurate tuning to the satellite signal. Once the correct direction is found, you need to fix the position of the antenna. Then the receiver is directly connected to the satellite dish. How to set up a satellite dish with your own hands using SatFinder: https://youtu.be/jkB05w8GlGA
Problems and solutions
On phones with a weak video camera, the data will be poorly discernible if you perform work in the daytime in bright sunlight. In this case, tuning work is best done in the morning or evening. If you set a high parameter of the tuning accuracy, it may break down due to the measurement error. The accuracy must be such as to ensure high signal quality. If you increase it too much, it will not improve it, but will only make it difficult to carry out the adjustment. Sometimes it is necessary to determine the correct direction of the satellite dish in the wrong place where the user is. The program provides such an opportunity. To do this, you need to activate the appropriate item in the settings. When the program is running, you need to view ads. This can be disabled by purchasing the paid version.There are no other differences between these options. The free version is fully functional.


💡